Thursday 14th January 2016
History
We arrived at the Winchester museum in the City Centre at 11am.
We were able to explore the museum while answering a few questions. The aim of this visit was too put our ‘teacher hats’ on and explore the different things we could do with our future pupils.
I explored the different floors (each with a different time period as it theme), taking pictures and answering the questions.


I really liked all mini activities available at the museum. They were engaging and would encourage children to actively get involved. I would definitely encourage my pupils to have a go at a few!
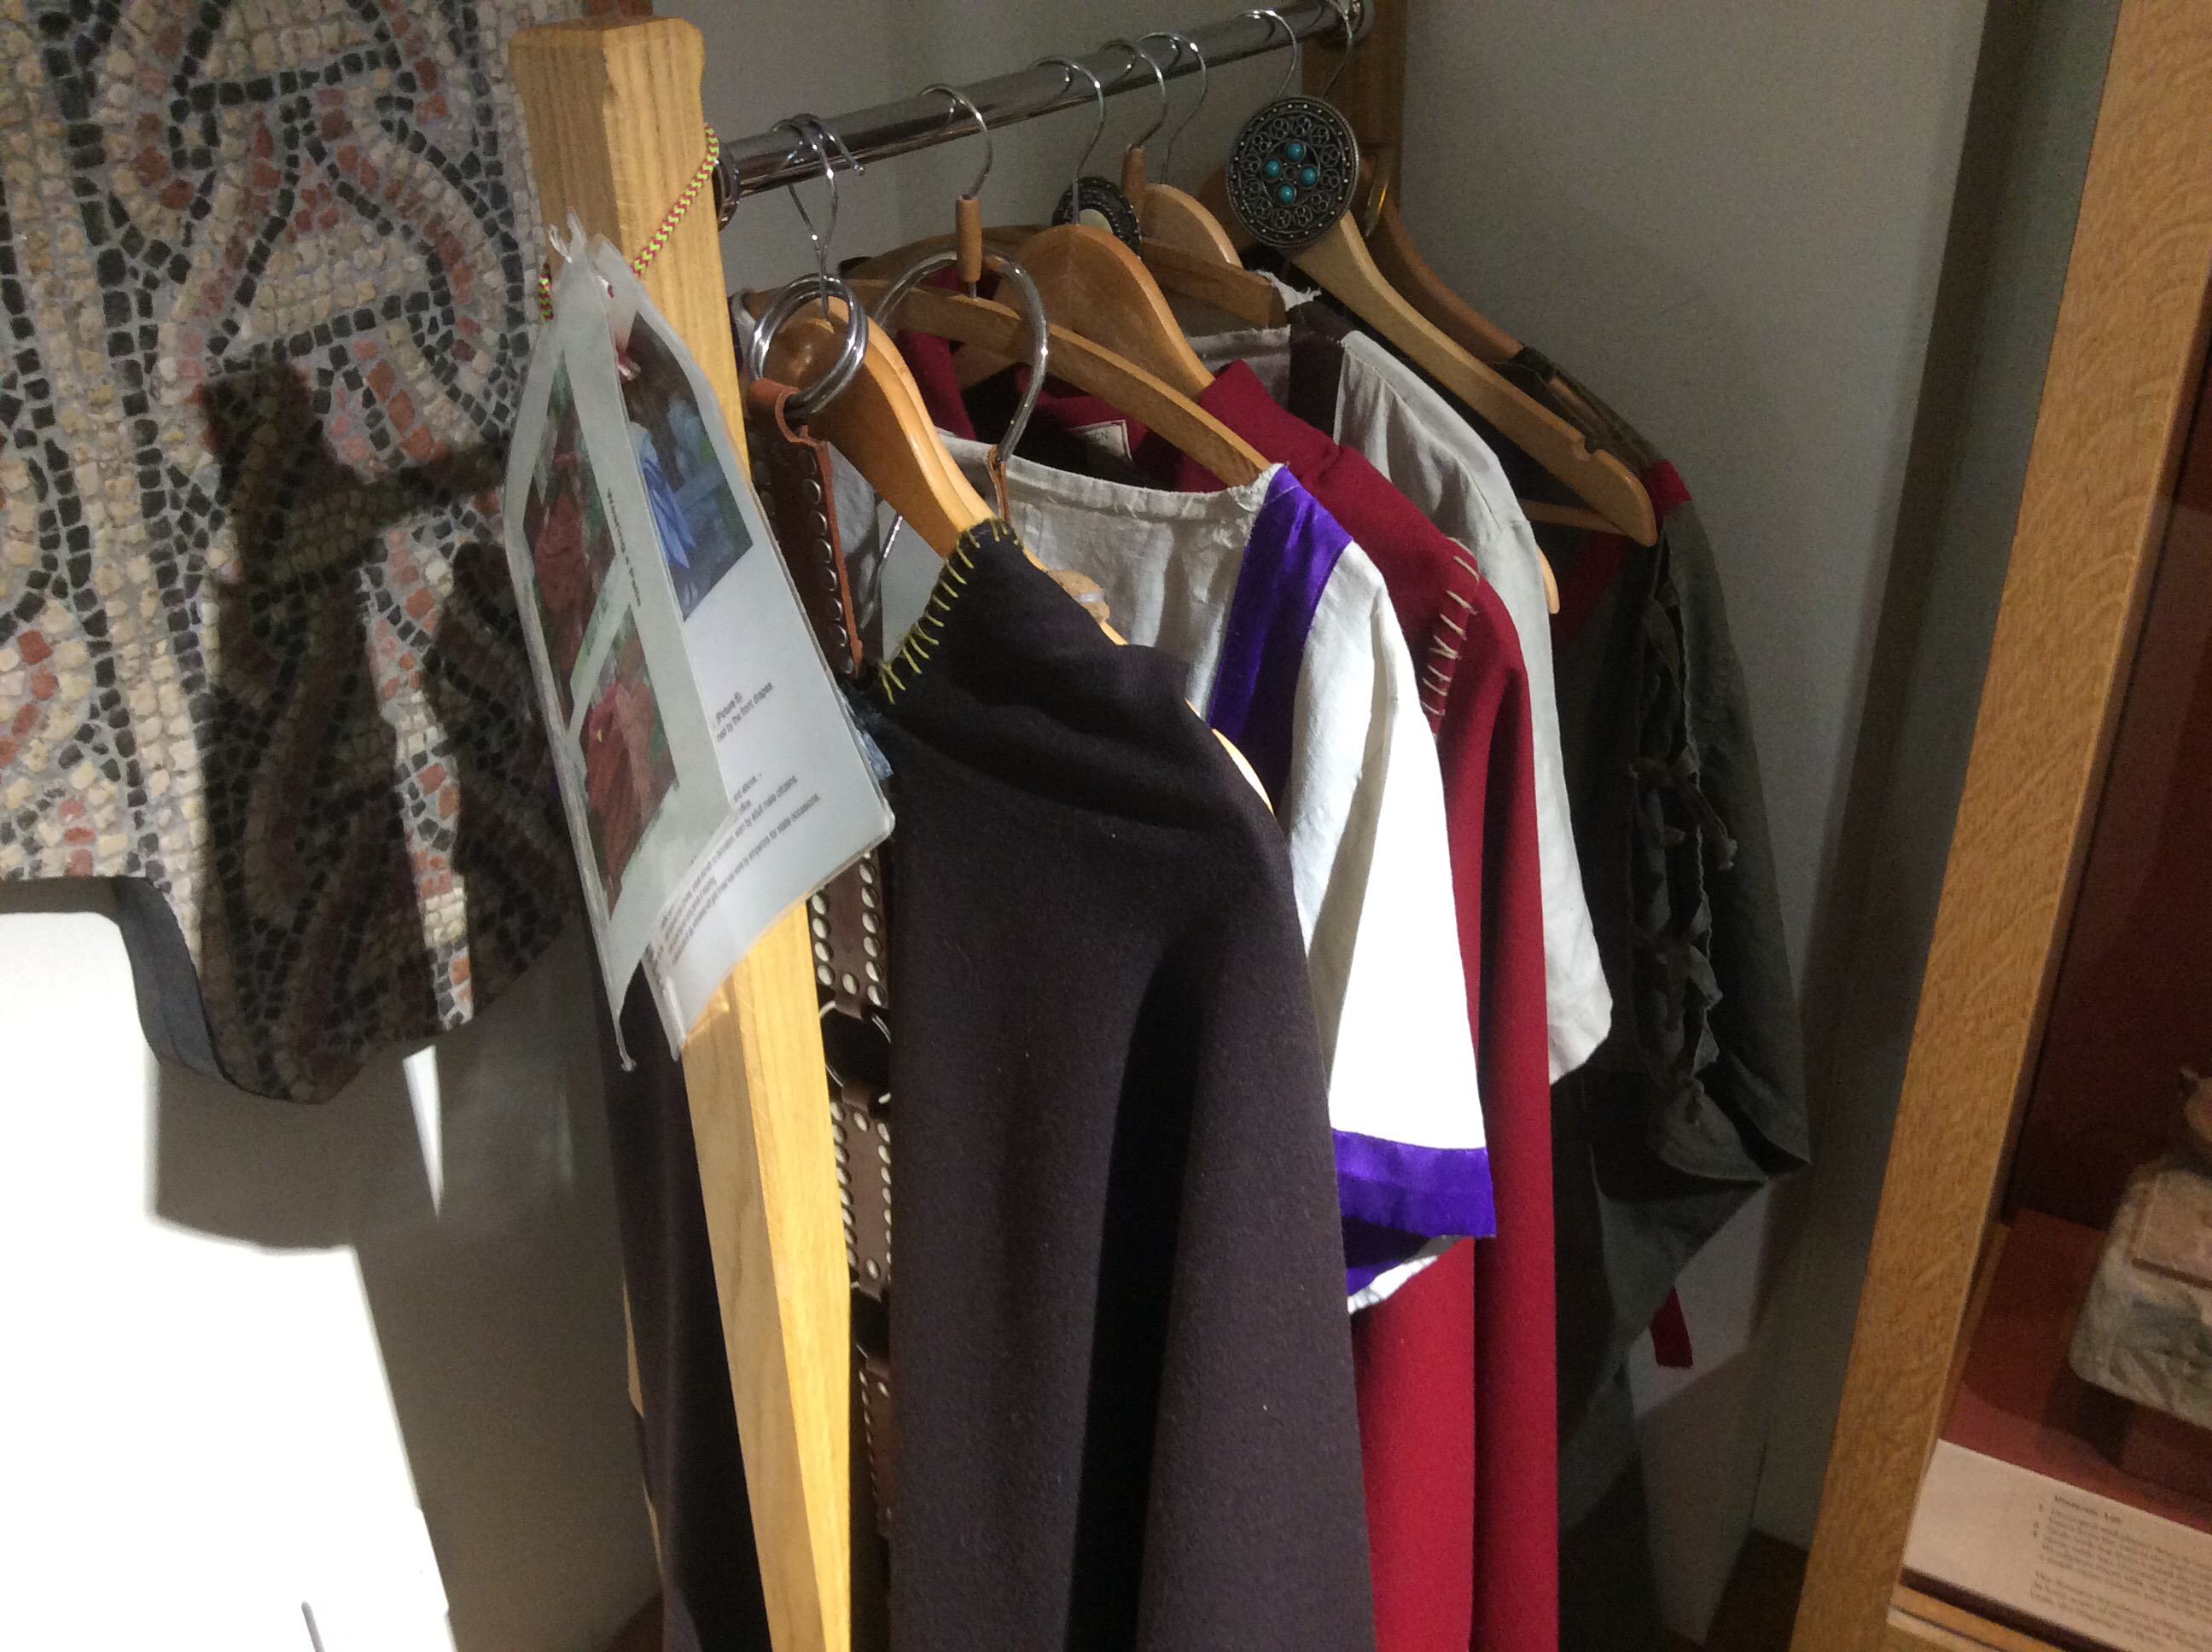


I also loved the different collections of outfits the children could try on. There were cards to go with each outfit describing how it was worn/who would have worn it/ what time period it was worn in. Would be really fun to use during role play.
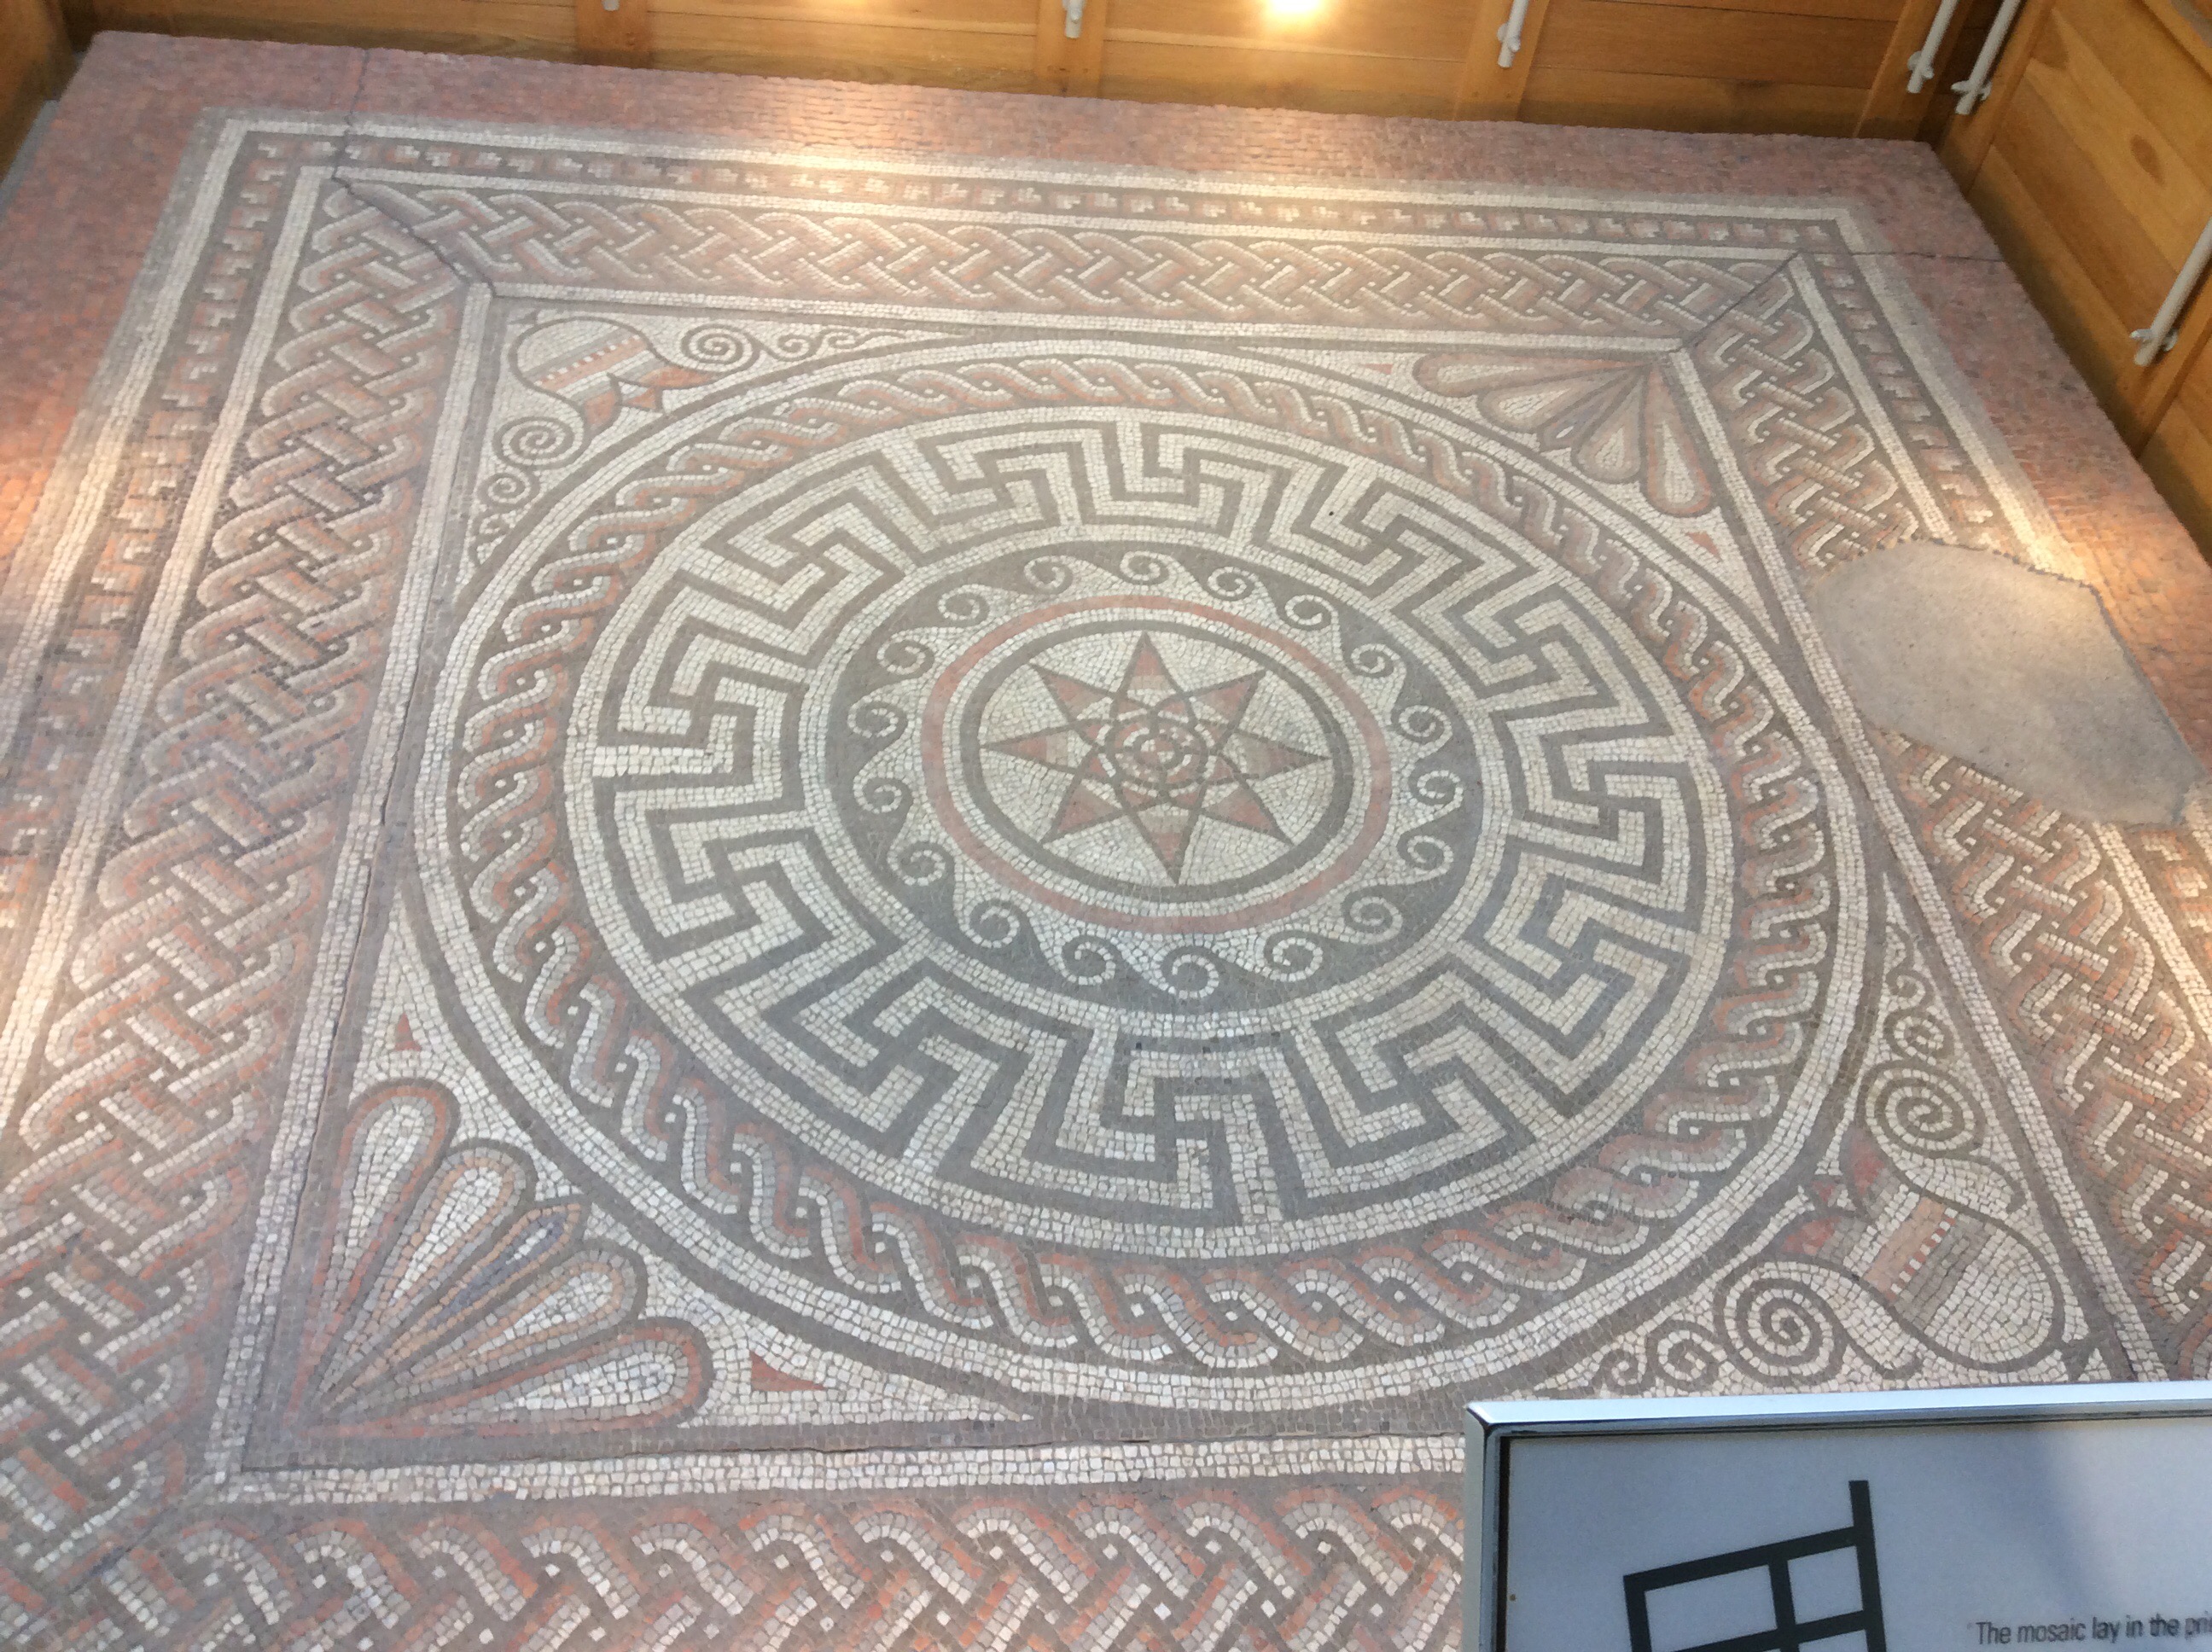

My group and I discussed this Roman mosaic and suggested that the children could design their own Roman mosaic. Additionally the children could create their own Roman villages. Children could work in small groups and each group could be in control of designing, creating a building a certain part of the village. I.e. the defenses, the bridge and wall, the houses, the farms etc.

We also thought that it would be nice for the children to speak to older members of their family, family friends neighbours etc and try and find out more about objects in the past. Maybe find out what has changed, what has stayed the same and they could even bring in an old item for show and tell.
Our second task of the day was to create our own city walk with a theme.
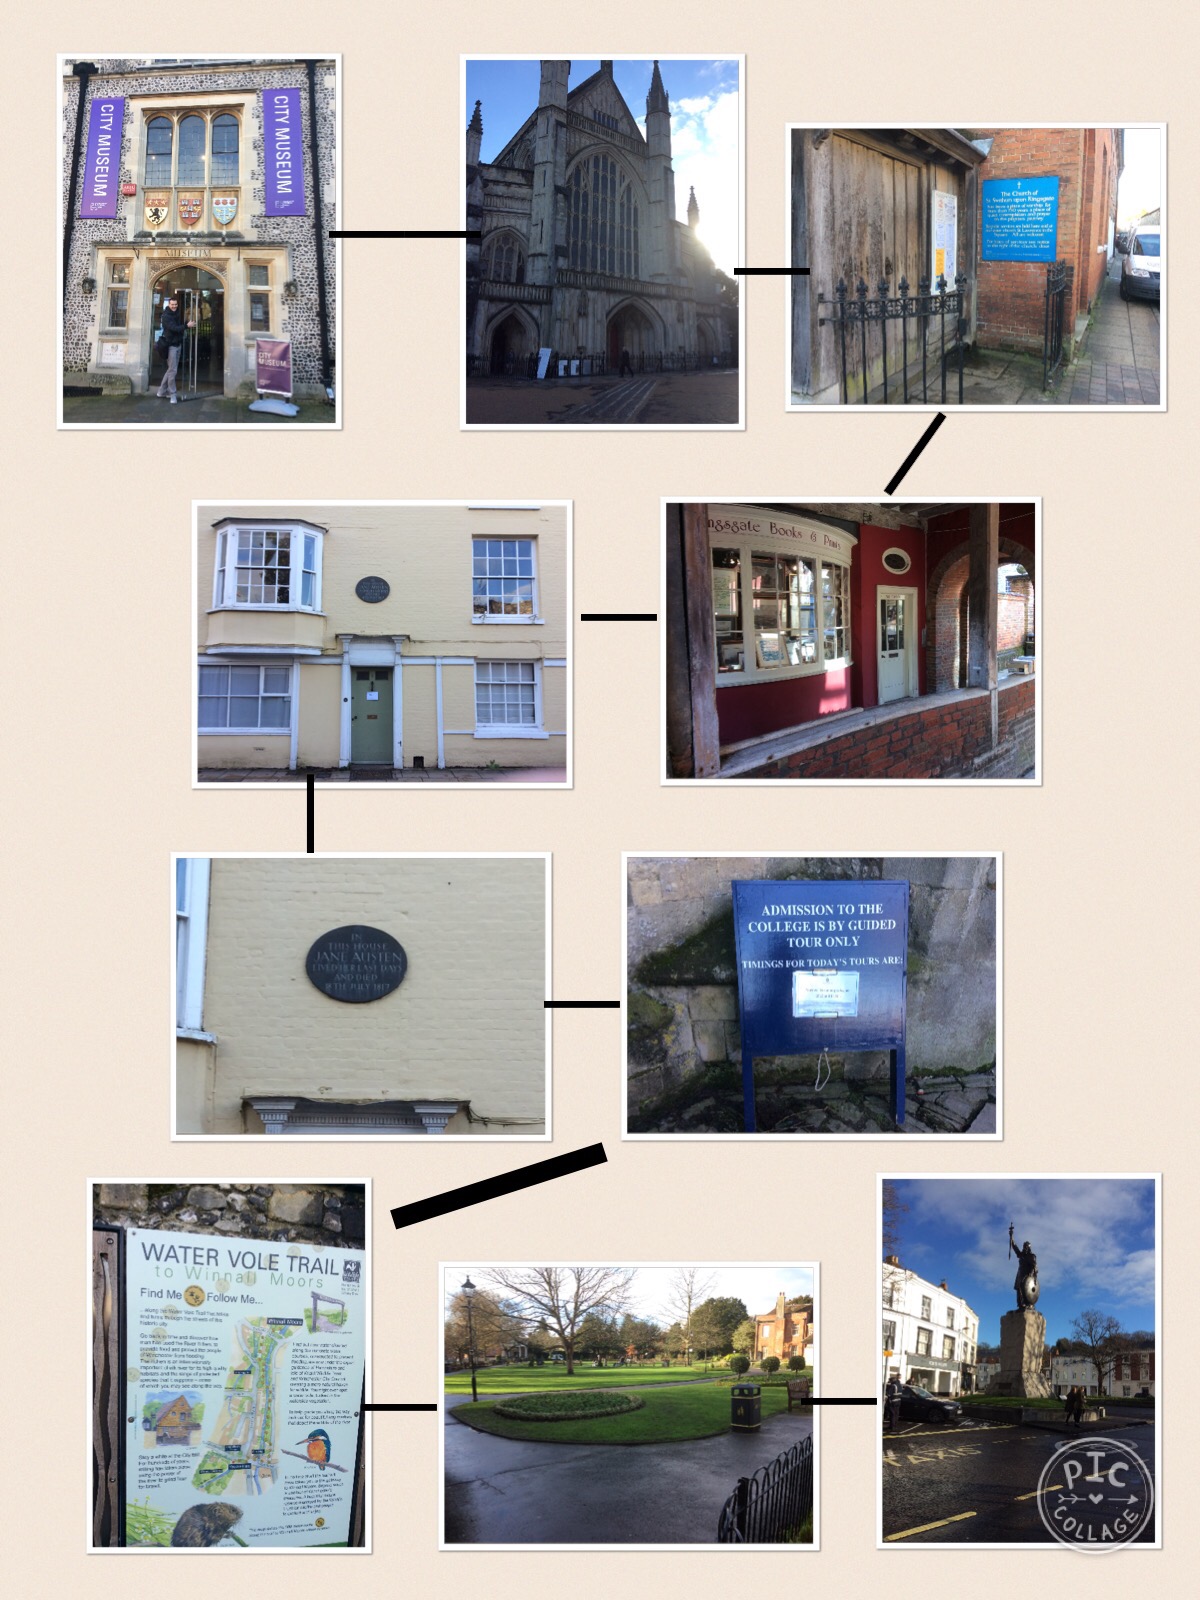
Our walk:
- Start of at the Winchester Museum. (Children can gather information on a chosen topic for a poster/class presentation/homework)
- Walk to the Winchester Cathedral and take a look inside. (Look at the stain-glass window-art lesson make their own using sweet wrappers.)
- There is a nice walk around the back of the Cathedral-a vintage book shop, the home Jane Austin died in and the Winchester College. (Ask children to look for literature relating to chosen topic.)
- We would then stop for lunch in the local park (Children could do a survey of all the different types of wildlife they can see.)
- Finally walk past St. Alfred’s monument and back up through the town (Show children pictures of the town from years ago, spot the difference game.)
Classroom tasks:
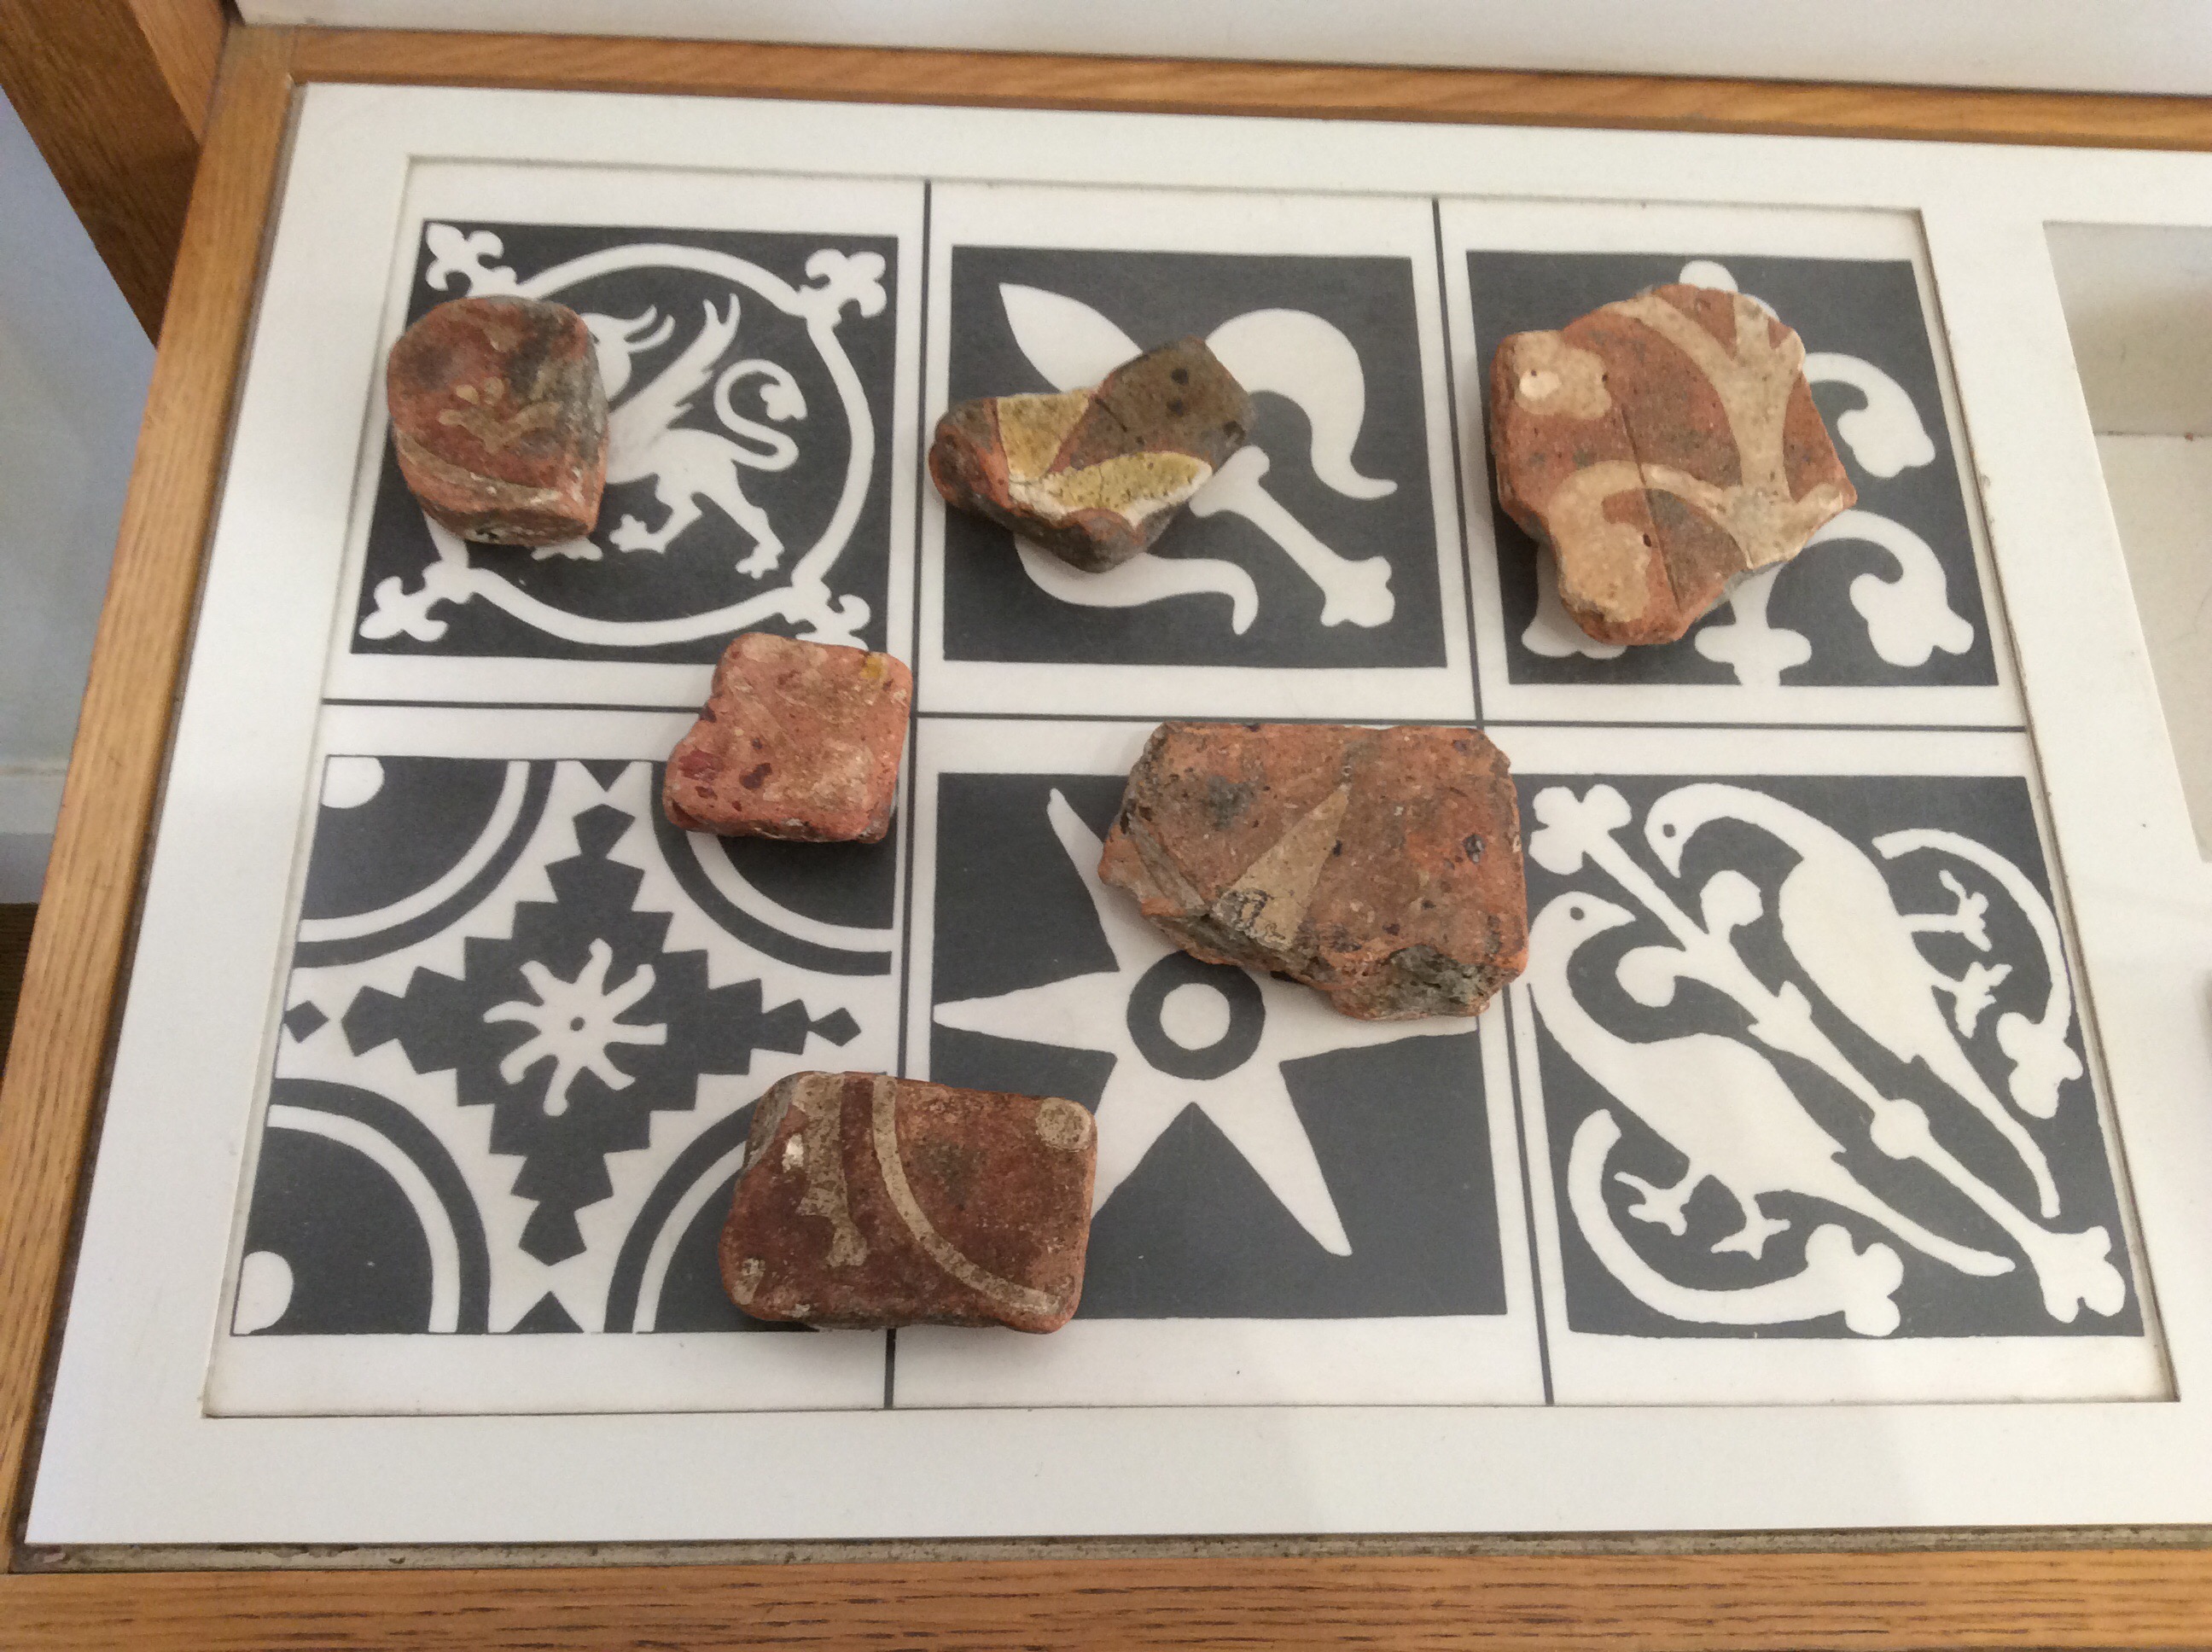
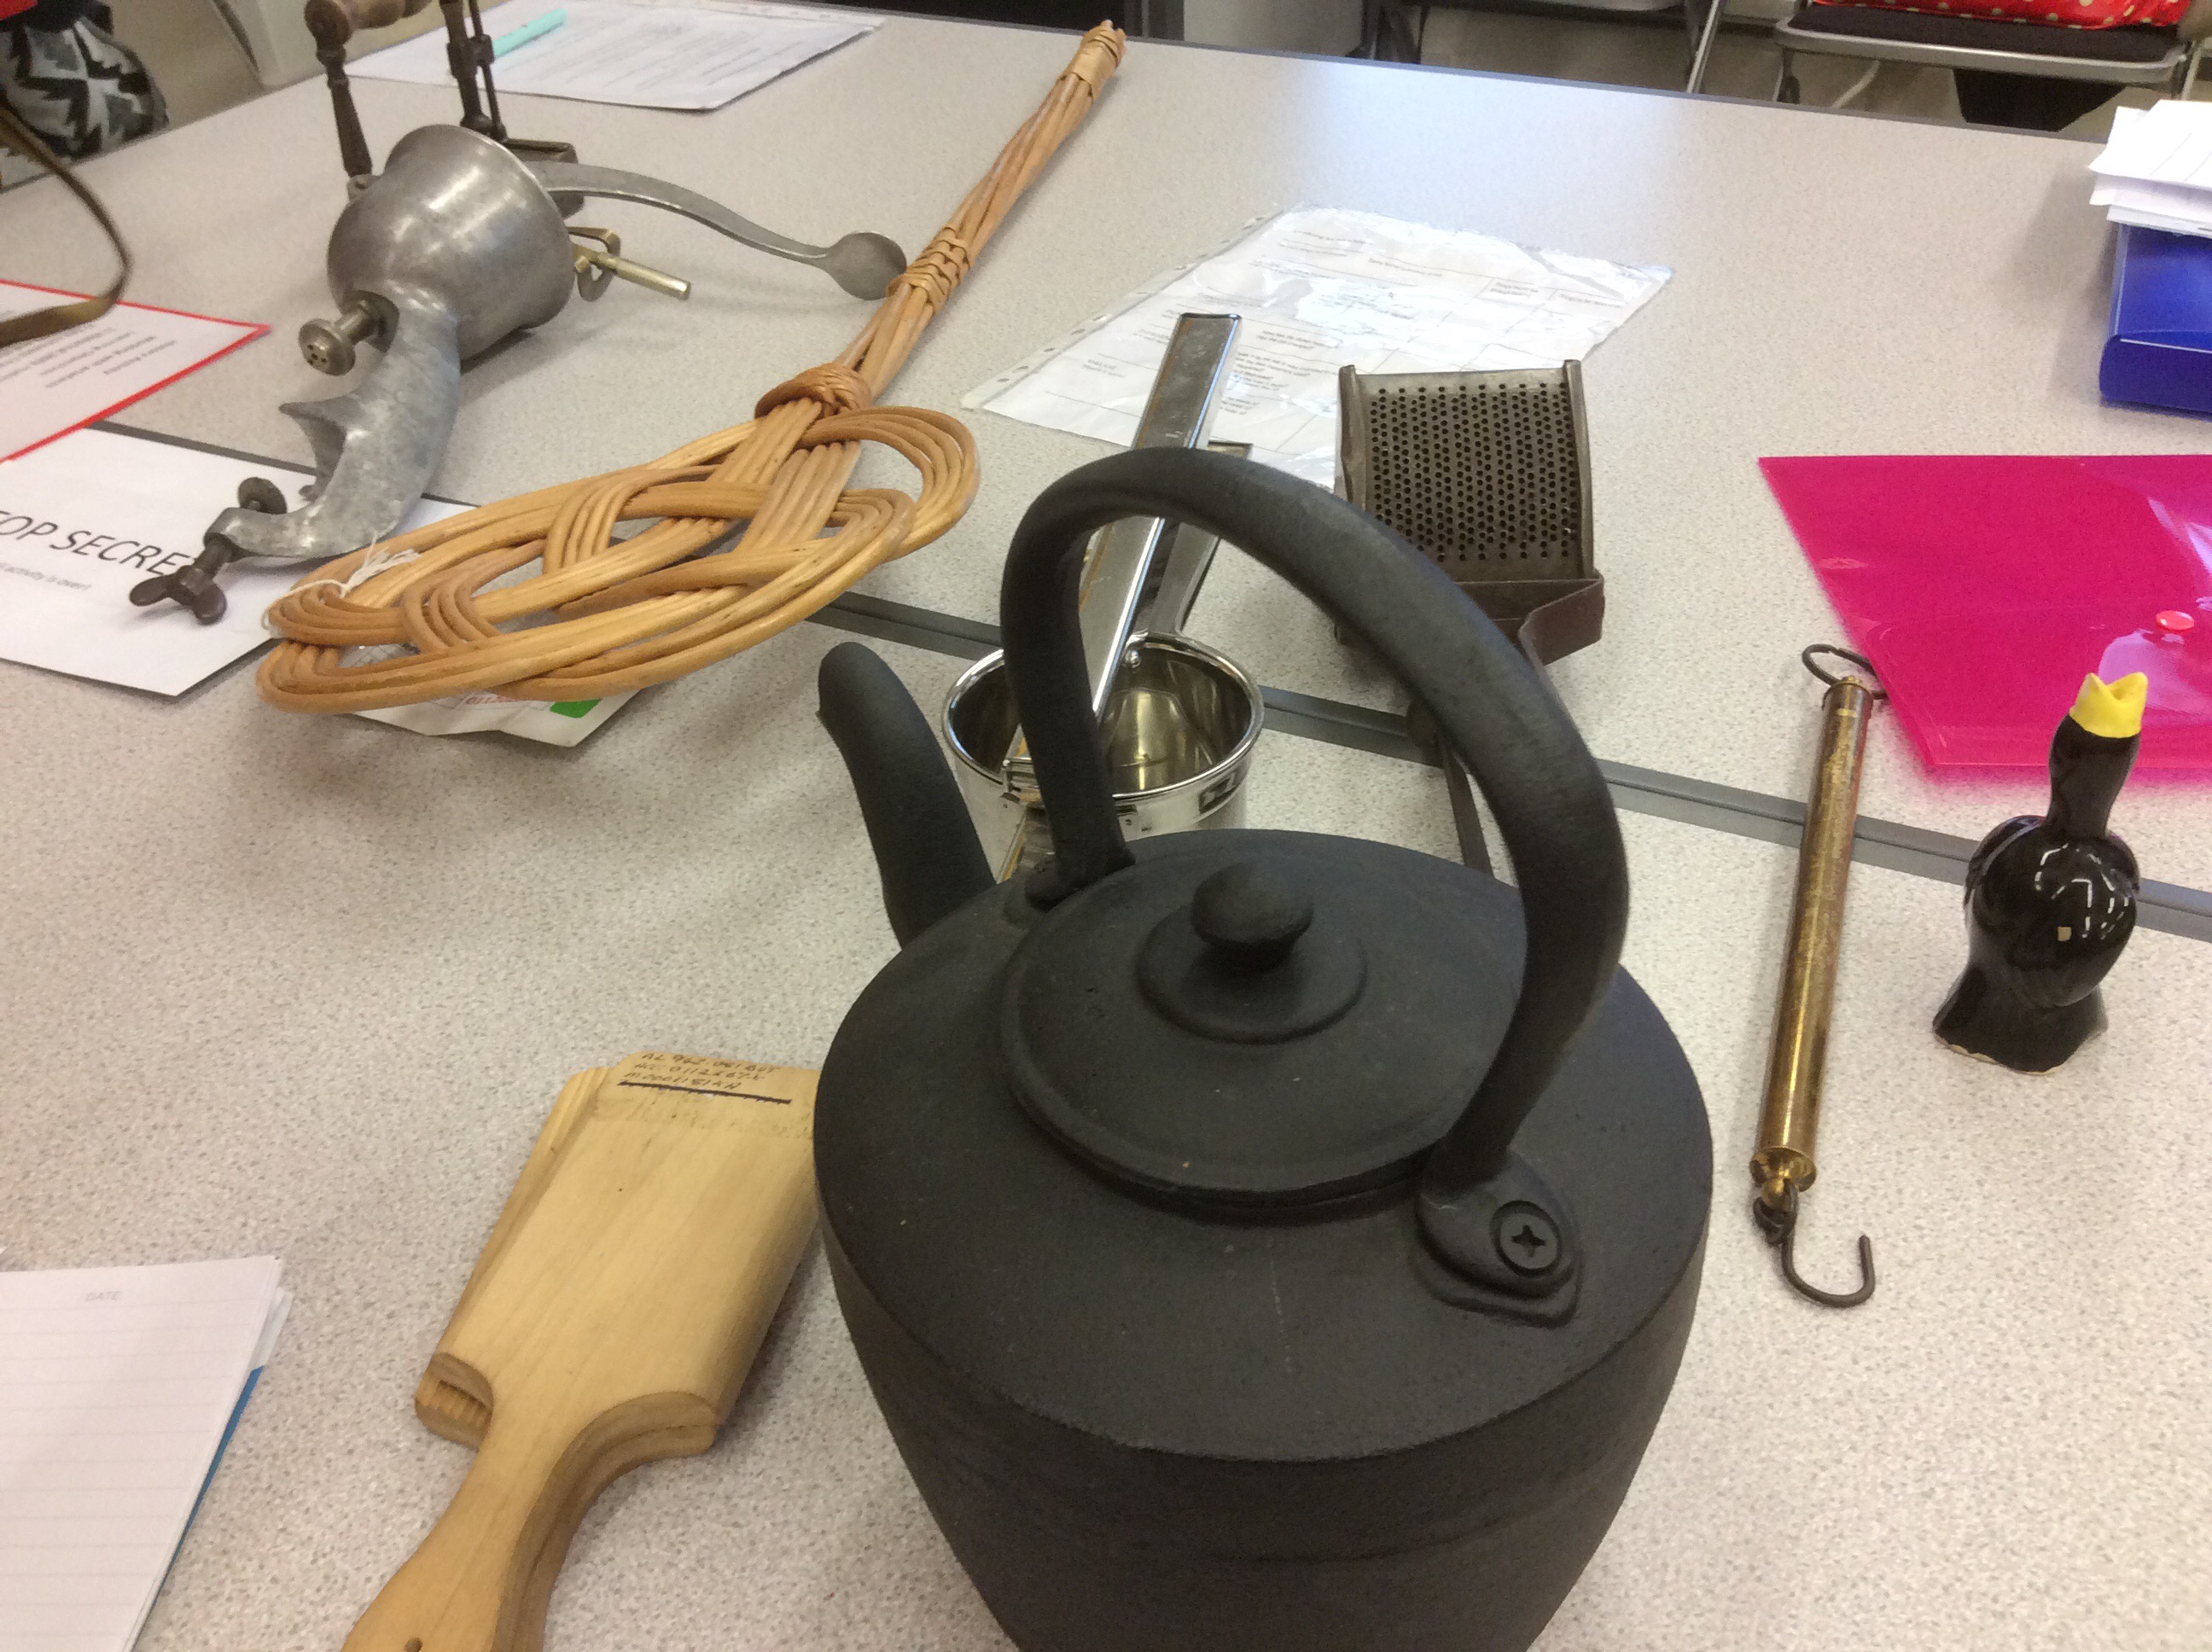
Firstly we looked at some objects from an older time period. I found it really engaging and fun trying to guess what the objects where, what they were used for, what materials they were made from and finding the link between the objects. Some of the objects were easy to distinguish what they were and their uses, like the kettle and the carpet beater. However I was surprised to find out that the blackbird was used in pie making to help keep the top of the pie raised and the two wooden pallets were used to soften butter. I loved this activity and think it is a brilliant way of engendering curiosity into a class of children; it really gets them thinking-questioning, discussing, using prior knowledge etc.
Secondly we had to create our own ‘school trip’ in Winchester.
However I decided to do a trip based in Ventnor on the Isle of Wight as this is where I am from and I felt I could create a better trip using this destination.
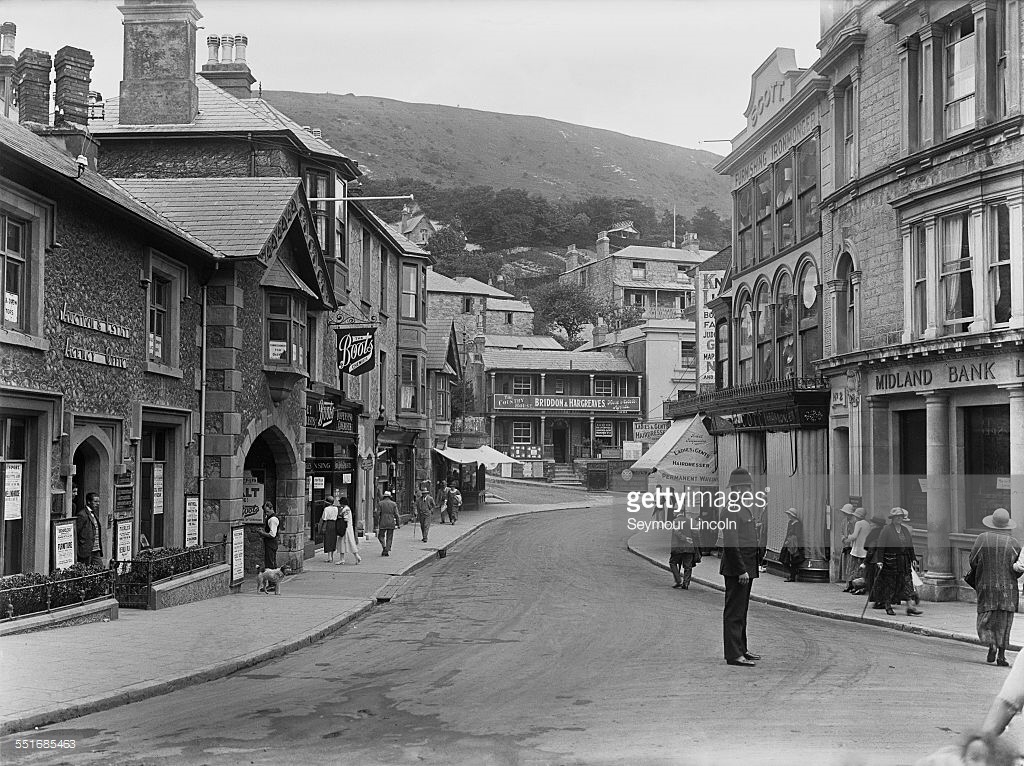
- Firstly the children would start in Ventnor high street with photos from the past and from the present. Tasks: spot the difference/ notice things that have stayed the same/why have changes happened?/what are different about the buildings?/Are the people wearing the same clothing?

2. Next the children can walk along Ventnor seafront and look again at comparison photos from past to present. I would then talk to the children about the Ventnor pier that was once found along this beach. I will ask the children to suggest what has happened to it, could create a little story (Big, scary storm-aliens took it away back to their planet etc.) Then what kind of things can you do on a pier? Has anyone been on a pier before? (Fishing, amusement games, Walking, Taking photographs, Food stalls.)(Linked to English.)


3. Have lunch on the beach, children can bring money for ice-cream. (Weather permitted.)
4. The children can investigate the top of the beach, small rock pools and by the shallow tide, looking for different objects. Keep a written note and/or take photographs of these objects. (Shells, stones, sand, crabs, tiny fish, seaweed.) (Linked to Science & Geography.)

5. Finally the children can go explore the shallow water-pool with an island in the middle. I could give the children a map of the island and they could use the water-pool to help them fill out where all the different places are. (Linked to Geography.)

Reflection
I have learnt:
- The procedures involved in organizing a school trip
- How important it is to conduct a pre-visit and use this visit to create learning objectives, activities and to help plan the trip
- To use objects to engage children
- To create an educational walk
- More about the city of Winchester
Positives:
- Had the opportunity to visit the Winchester Museum & explore Winchester City more.
- Came up with some good activities for children to do while in the Museum, back in the classroom and at home.
- Had a chance to look at old antiques (will definitely try and do this with future classes.)
- Created my own School Trip
Thursday 21st January
Early Years
During the morning session we looked at:
- Positive relationships- Social and emotional development:The EYFS
- Positive relationships- Social and emotional development: The Key person
- Positive relationships: Working with parents, carers and families
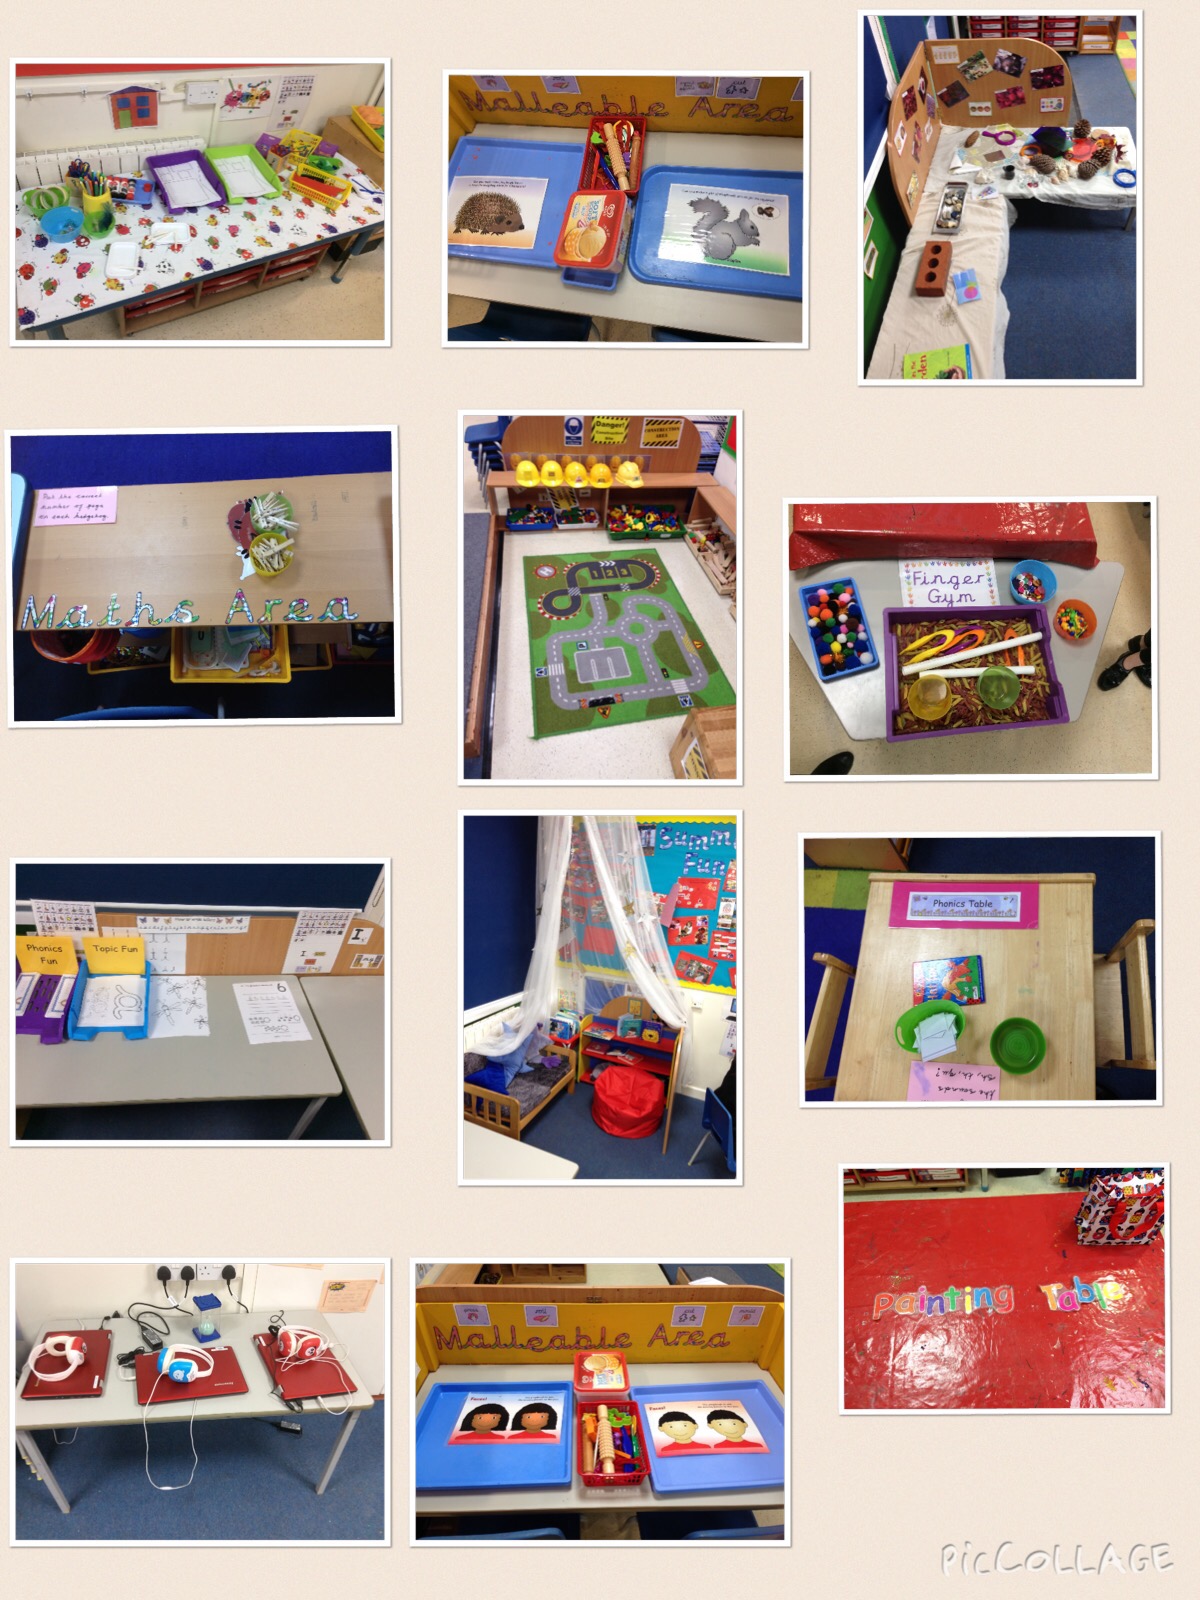
We started by talking about our SE experience, discussing what an early years classroom looks like. I was placed in a Reception class so had a lot to share with the group. Around the classroom were lots of different stations for the children to interact with, including the finger gym, literacy, reading corner, painting area and malleable area. There was also an outside area for the children to play, with more stations including, water works, sand pit, cars, bikes and writing board. The children had a colourful bug rug to sit on during inputs and plenaries. There was also an IWB that the teacher used everyday and the children were allowed to use during lessons. I collected a variety of images, see below.


We continued discussing SE while answering: What did you notice about the importance of social and emotional development?
I found that the TA was regularly involved in looking after children who were upset, emotional or feeling unwell. She provided a lot of support for the children and the teacher. The day was based around free play meaning children were free to interact with whoever and whatever they wished. This allowed children to explore and learn new things about their surroundings, others and themselves. On one occasion there was a scrabble in the playground; the teacher spent 15 minutes discussing with the children why this is wrong and how it can make people feel-she really focused on the feelings of the children.
Positive relationships- Personal, Social and Emotional development-
What do we need to know?
•Social development is learning to live with others in society
•Generally accepted that our childhood experiences will affect our personalities.
•Being with people and learning to build relationships are important skills.
•Helping children to develop these skills is a crucial part of working with children.
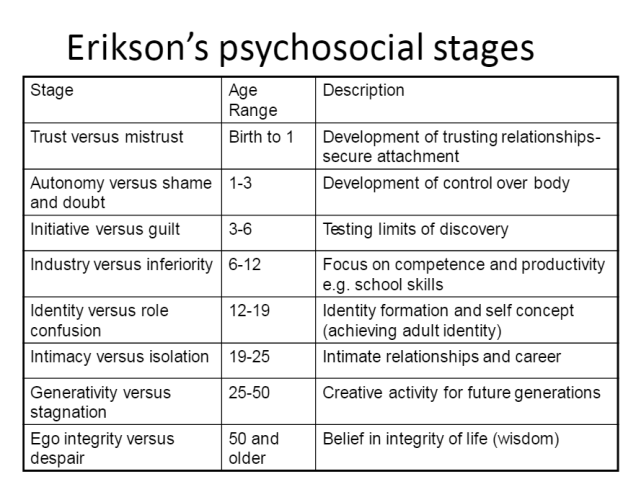
We then discussed stage theories proposed by different psychologists.


Bandura(1925) Social Learning theory.
• We learn much of our behaviour through conditioning positive and negative reinforcement.
• However we also learn by observing others behaviour.
• His examined the effects that aggressive adult behaviour had on children.
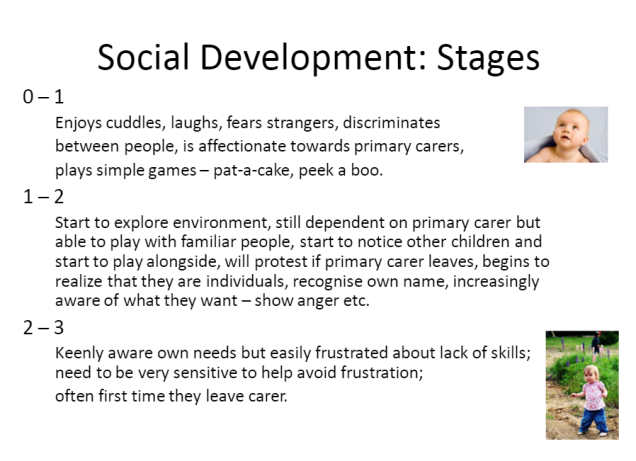


It was interesting to discover the different stages involved in social development and how much more complex the next stage is than the last.
We then discussed:
What skills do children need in order to develop and maintain friendships?
- Confidence
- Kindness
- Caring
- Sharing
- Positive attitude
- Thoughtfulness
- Friendly
- Approachable
- Inclusive
- Good communication
- Common interests
Personal, social and emotional development:
• Self-confidence and self-awareness: children are confident to try new activities, and say why they like some activities more than others. They are confident to speak in a familiar group, will talk about their ideas, and will choose the resources they need for their chosen activities. They say when they do or don’t need help.
• Managing feelings and behaviour: children talk about how they and others show feelings, talk about their own and others’ behaviour,and its consequences, and know that some behaviour is unacceptable. They work as part of a group or class, and understand and follow the rules. They adjust their behaviour to different situations, and take changes of routine in their stride.
• Making relationships: children play cooperatively, taking turns with others. They take account of one another’s ideas about how to organise their activity. They show sensitivity to others’ needs and feelings, and form positive relationships with adults and other children. (EYFS, 2014,p.11)
Positive relationships- The Key Person
Attachment theory.
•The work of John Bowlby (1907-1990)
•He suggested a link between maternal deprivation and juvenile crime (1944)
•Attachment between infant and carer (1952)
•There was much contemporary criticism of his work
•He himself altered his views
The importance of forming secure attachments.Securely attached children have been found to be superior on a range of measures including:
- persistence when solving problems
- making friends
- using symbolic play
- social and cognitive competence
- engaging in successful problem solving
I learnt about Bowlby’s theory of attachment during A-Level psychology. John Bowlby and Mary Ainsworth conducted a series of experiments to test different children’s attachment types. Their main experiment was called the ‘Strange Situation’ where the mother would enter a room with their child and then leave them alone with a stranger. How the child reacted determined their attachment type. Ainsworth and Bowlby originally categorised children into 3 sections, secure, insecure avoidant and insecure resistant attachment. However they found a percentage of children didn’t fit into any category so they created a 4th section, disorganised attachment.

We then watched a video, focusing on the question: ‘What signs are there that Ava has benefitted from secure attachments at home?’
- Confident to explore away from mum
- Has built relationships with other adults (hierarchy)
- Good development of speech and communication skills
- Happy
- Eager to try new things
- Gets a bit upset when mum leaves her at nursery, but soon settles in as she knows mum will be back
Go back in time . . . Can you think of a ‘key person’ in your educational life?
- Why do you remember them so clearly?
- What influences do you think they had?
- Have they somehow shaped a part of your
life?
I can remember my Year 6 Science teacher. He was really positive and always supported me with my work. I remember him especially because he always challenged me to do more, improve and reflect upon my work and made me feel like I was achieving to a high level! He was one of those teachers that always encouraged children to reflect on their work, ‘rather than saying-this is really good, he would always say ‘now go back and change 2 things to make it even better!’ To this day I always reflect on my work and strive to make it the best it can be!
What do you think are the key qualities and attitudes of the key person?
- Loving
- comforting

- caring
- kind
- compassionate
- happy
- positive
- friendly
- empathetic
- inspirational
- supportive
- provide a safe environment
- to teach good life lessons and skills
- to impart knowledge of the world
- provide for social, emotional and physical needs
Finally we focused on the importance of making observations. We watched short video of a young girl playing by herself with some toys. My observations:
- She placed all the play food onto plates, selecting cutlery-however not always the right utensil for the food (i.e. a fork for soup.) However she is imitating behaviours she has seem before.
- She was speaking aloud to herself -externalising her thoughts
- Counting-using song
- She went upstairs collect her dolls and the sat them each in front of a plate
- Kissed them-showing affection-however then throws a doll across the room-realises its not real
Recording this observation has made me realise how useful, from a teacher’s perspective, observations are. Just from this 5 minute observation I know now a lot more about this child than I did before. I can interpret her feelings, character, social development, cognitive level etc. However I can see how observations may be harder in a classroom situation as there are many more children. -Maybe more efficient to complete group observations.
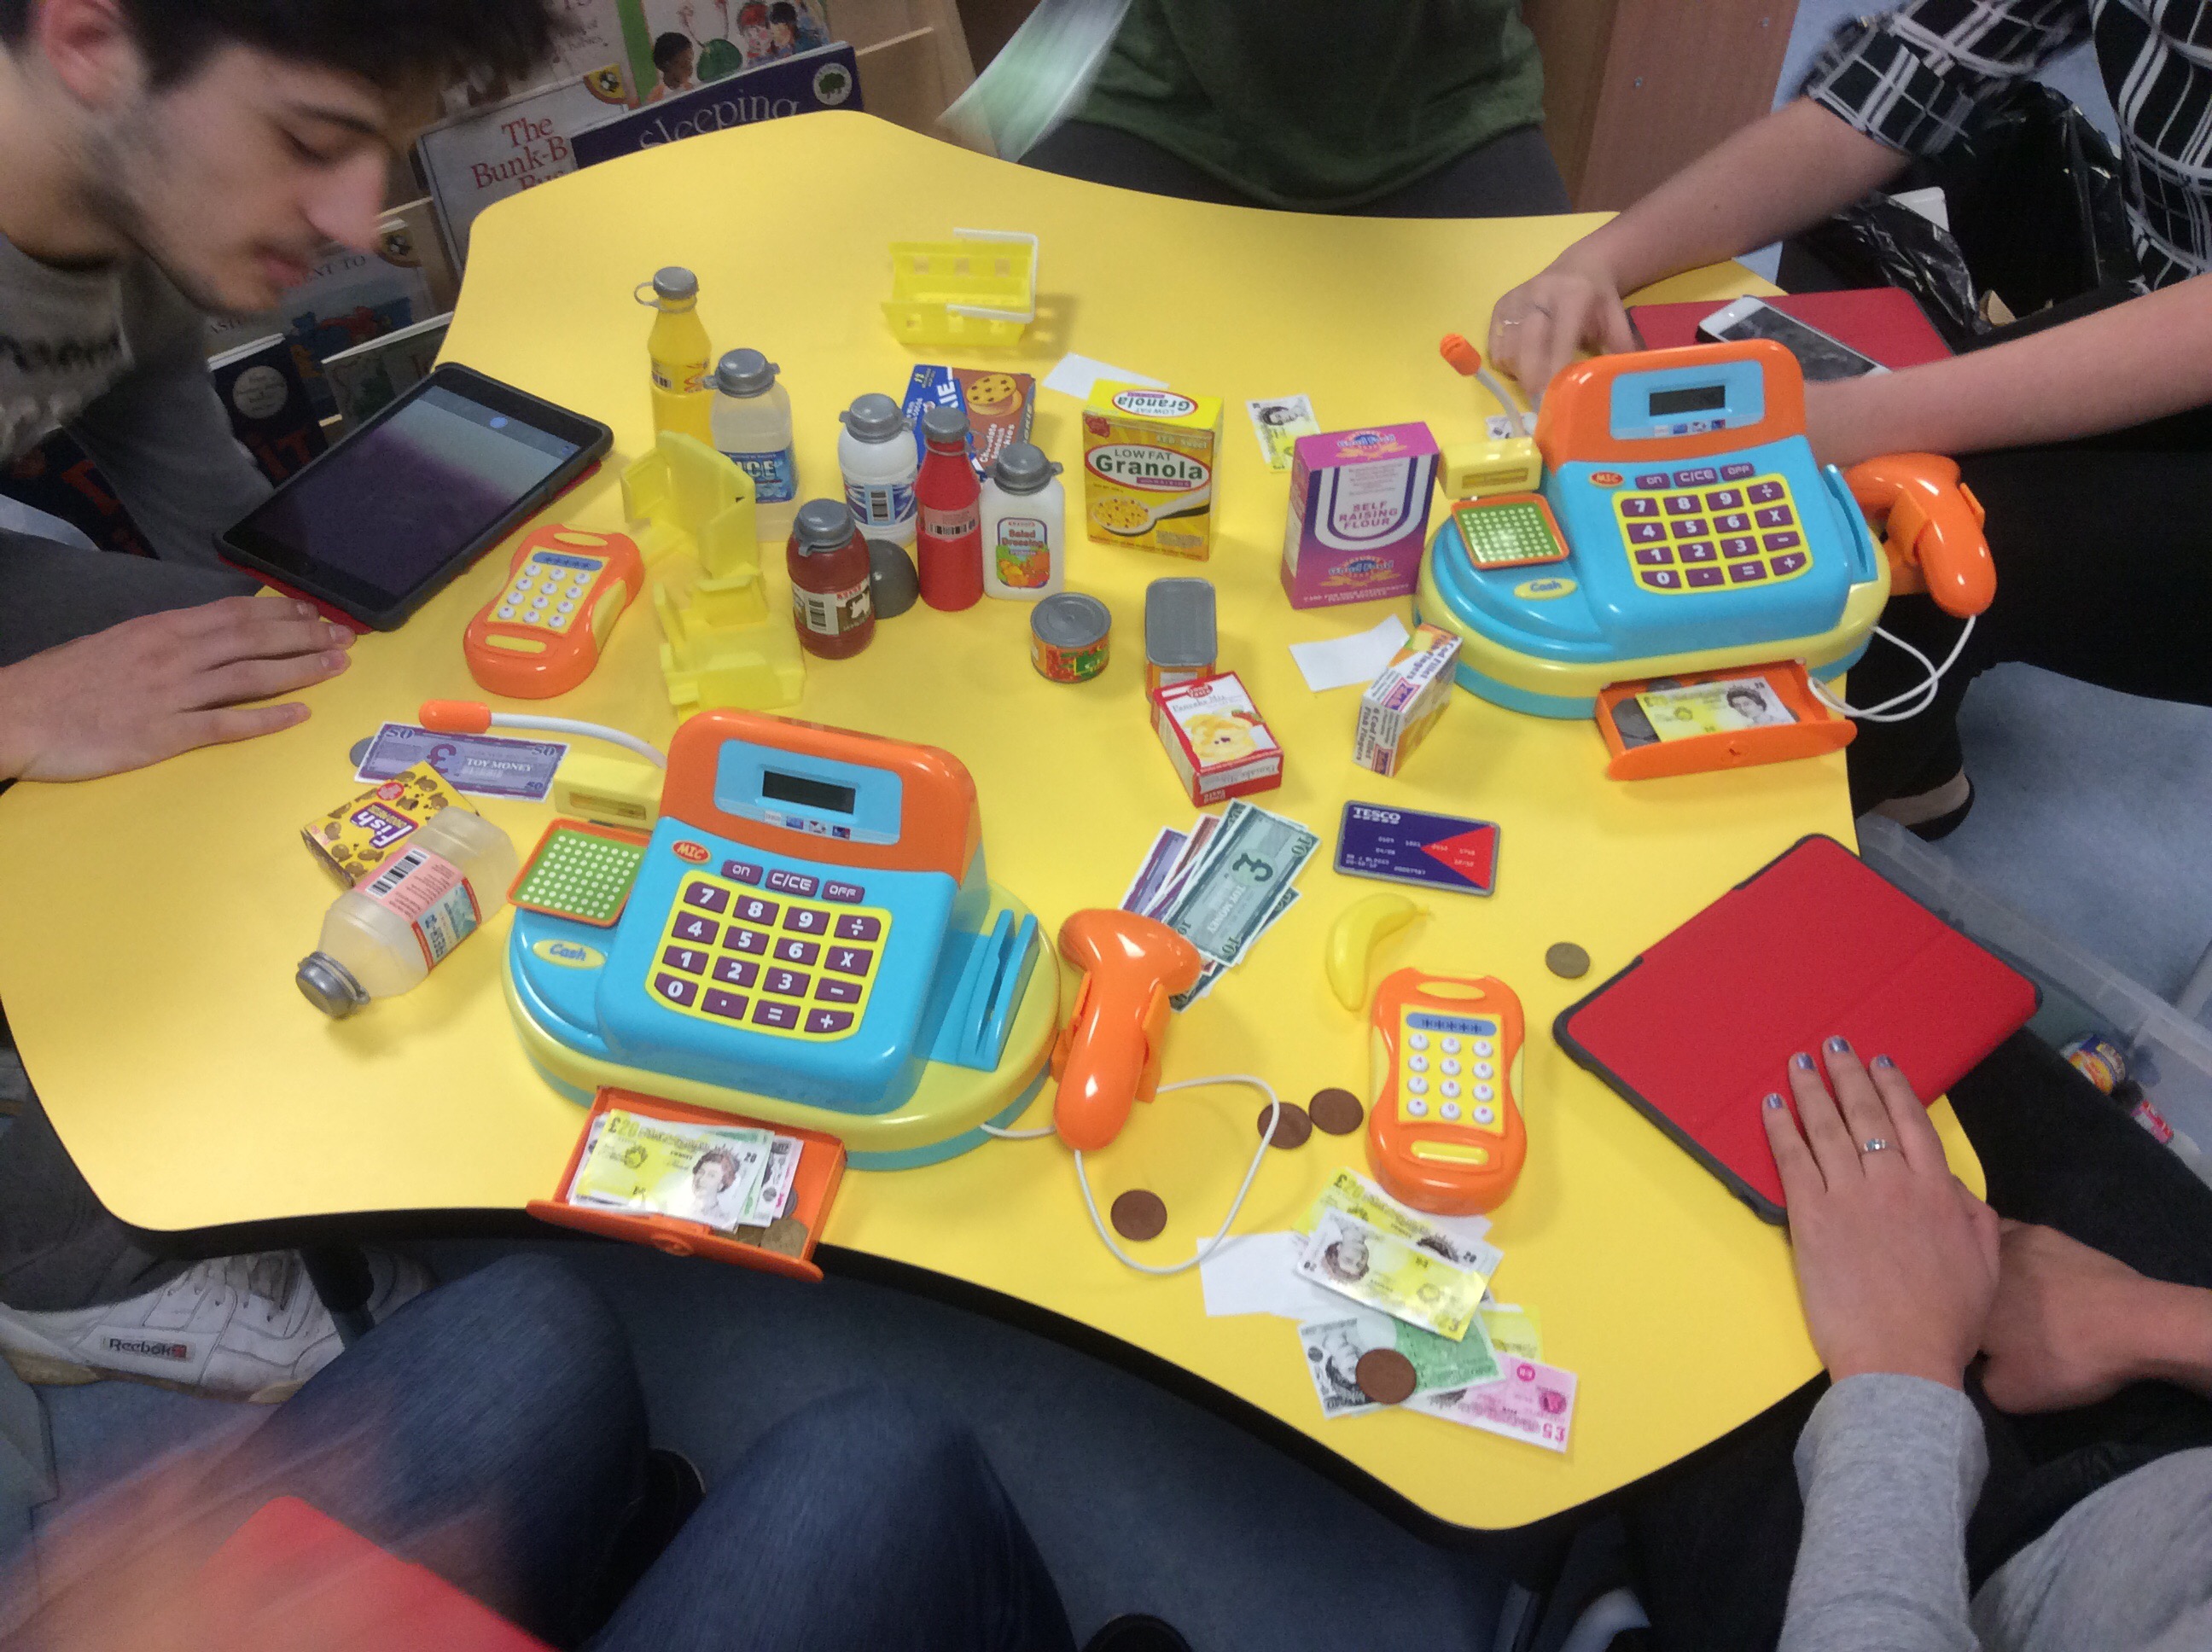
To end the session we explored some of the Early Years resources that were spread around the classroom.
Reflection:
What have I learnt?
- about the personal, social and emotional development of early years children
- the skills children need to maintain friendships
- the role of a key person and others
- the attributes of a key person and others
- further strengthened my knowledge about different attachment types of psychology theorists
- the importance of observations
We ended the session by exploring the Early years resources spread out around the room.


Thursday 28th January
Today’s seminars were split across two wider curriculum subjects:
RE & Music
L.O:
- To become familiar with the Locally Agreed syllabus ~ Living Difference (revised 2011)
- To work through a Living Difference unit
- To explore ways of making RE creative
Our starter activity was to discuss whether we would be a window or a door. I said I would be door with a window! Trying to trick the system! But my reasons behind this were if I could see new opportunities in front of my through the door I have the choice to open the door and grab these opportunities or keep the door closed. .jpg)
We were then shown a donut-yet another metaphor for RE.
We thought that dough of the donut is all the teacher teaches, the icing is what the children remember and the sprinkles are the things the children really engage with a are passionate about learning.
Next we had to arrange some ideas into concepts.

I found this task daunting as I didn’t recognise half the words we were shown, however we all worked together to categorise them. We split them into words not of faith, words of faith and religions.


It was interesting to explore the 3 different types of concepts.

I really like this model-cycle of learning.
- Choose a concept (common to many religions)
- Then chose a subject within the concept (worship)
- Communication: what are you feelings about worship? What do you know about worship?
- Apply: how does worship affect your life? Is worship important or not?
- Enquire: why do you think people worship? who do people worship, the same thing?
- Contextualise: Look at the stories, artifacts, festivals about worship
- Evaluate: Why is worship important to the religious people we have learned about?
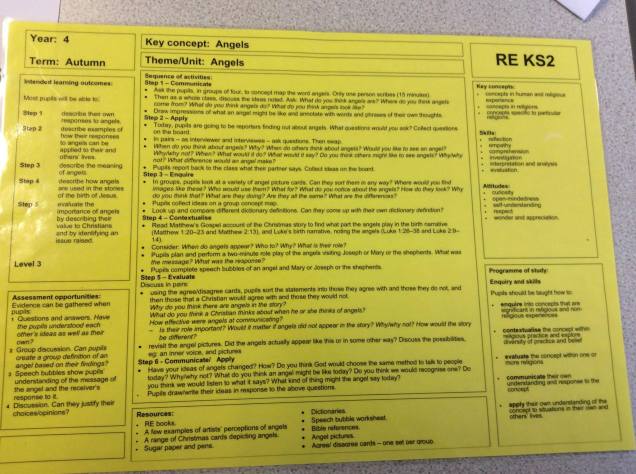
Our final task involved going outside to look for something out of the ordinary. At first we were confused, however we soon began to find coloured feathers scattered around outside. We brought these back into the classroom and began to look at a section of the living different curriculum-angels. I liked going out of the classroom to explore, it gave us a chance to stretch our legs, get some fresh air and hunt for something.
Angels:
We then mind mapped words we thought related to angels.

Next we had to recreate a scenario where angels were involved in the Christmas story and hold a freeze frame. We decided to hold a freeze frame of when the angel visited the shepherds tending to their flock of sheep. I love freeze frame activities, they are fun and encourage children to portray a story and feelings through facial expressions and body language. Gives the children the opportunity to practice their presentation skills, drama and communication.

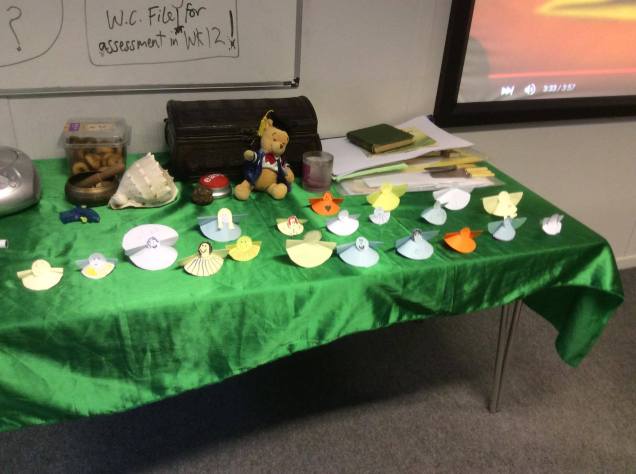
We then had to make our own angels following the instructions shown in this video.
This activity was enjoyable however the video had to keep being paused as everyone was at different stages in the making process. To improve this activity I would give each child or small groups an Ipad each and they could use this to watch the video.
Reflection
What I have learnt:
- More about Living Difference
- 3 main concepts within RE
- One section of the syllabus-angels
- how to incorporate freeze frame activities into RE lessons
- A useful model of learning
Music
1. Be able to devise listening and appraising activities to support the development of
Firstly we recapped the inter-related dimensions of music
- Pitch: high/low
- Duration: rhythm and pulse (steady beat)
- Dynamics: louder/quieter/ silence
- Temp: faster/slower
- Timbre: different types of sound
- Texture: different ways sounds are combined
- Structure:different ways sounds are organised
Useful website that describes the inter-related dimensions in more detail: http://primarymusiclessonplans.com/2014/03/09/2014-music-curriculum-the-inter-related-dimensions-of-music-easy-and-fun/
Next we talked about the BBC Ten Pieces resources.
We listened to a shortened version of Mars:The Planets and discussed what emotions children may describe feeling while listening to this piece of music.
- scared
- excited
- frightened
- in suspense
- rushed
- hyper
- sad
We then discussed the different ways of responding to music:
- Talking about sounds and music: a key aspect of your role is to support the development of children’s ability to express ideas and opinions (musical vocabulary) (We did this in our first music session, it was very productive and gave us a chance to hear others opinions and share our own.)
- Movement – body percussion; moving around the floor to a steady beat; dance (In PE we created a dance based around a piece of jungle music)
- Art – responding to musical elements or creating images in response to music (In art we had to draw a pattern while listening to a piece of music)
- Sounds around us – listen to sounds in the environment on a sound walk and record these electronically, then make a display to represent the sounds visually
There are many ways of responding to music and the cross curricula links that can be made.
Next we got engaged with some vocal warm up activities. I really enjoyed the Boom Chicka Boom activity, it was really fun. It involved repeating a set of lyrics but each time in a different way (like a mouse, quiet, like a little girl, high pitched.) The video demonstrates the warm up activity.
Next we had a go with the Boomwhackers! Something I had never seen before! Firstly we watched a video.

I was really interesting in these instruments. I didn’t realise a plastic tube could be so
musical! We started off by doing a whole class boomwhacker song. This was great fun and sounded great! We then had the opportunity to make our own. We found some easy boomwhacker music on this site and chose to have at one of them.

http://www.magicmusictutor.com/q=boomwhackers#sthash.pOJGJ9Mp.Ve6Fli07.dpbs

Next we had to compose a jingle or rap to convey a key message, we were shown examples. (Kit Kat jingle.)
We decided to make a rap about bullying. It was a really fun and engaging process and we selected a topic that is important (using music is a good way to get the message across.)
Finally we looked at example worksheets that you could incorporate into the classroom, some were better than others.

We really like the example that had lots of different areas for the children to fill out. Some involved writing a sentence or two, others involved circling things. I like this layout as it breaks it down for children and isn’t as daunting as loads of questions and lines on a sheet of paper. Also offers children the opportunity to express their opinion more freely. We then had a go at creating our own worksheet.

Reflection
What I have learnt:
- Improved understanding of inter-related dimensions of music
- first time using boom whackers! -now know how to incorporate these into music lessons
- a few vocal warm -up activities that I can use at the start of lessons
- using music as a starter activity-asking children to listen to the music are wirte down how it makes them feel
- how to create an effective music worksheet
Thursday 4th February
Languages
L.O:
- To develop an understanding of the progression of teaching listening and speaking, reading and writing in a new language
- To explore and investigate resources and activities which can be used to support the learning and teaching of these 4 language skills
The aim of today is expose you to a range of different learning resources, activities and games that you can apply to any language and adapt to a range of different contexts/ topic areas.
Les Couleurs-
-Introducing words using actions
- Blue/bleu=fish, make sounds like blowing bubbles
- Green/Vert=sound of hoover
-Practising words in an active way
-Fruit salad game-we were each given a colour. When this colour was called out we had to swap seats with someone else who had to same colour.
-Echo patterns-repeating what the teacher says


Les Nombres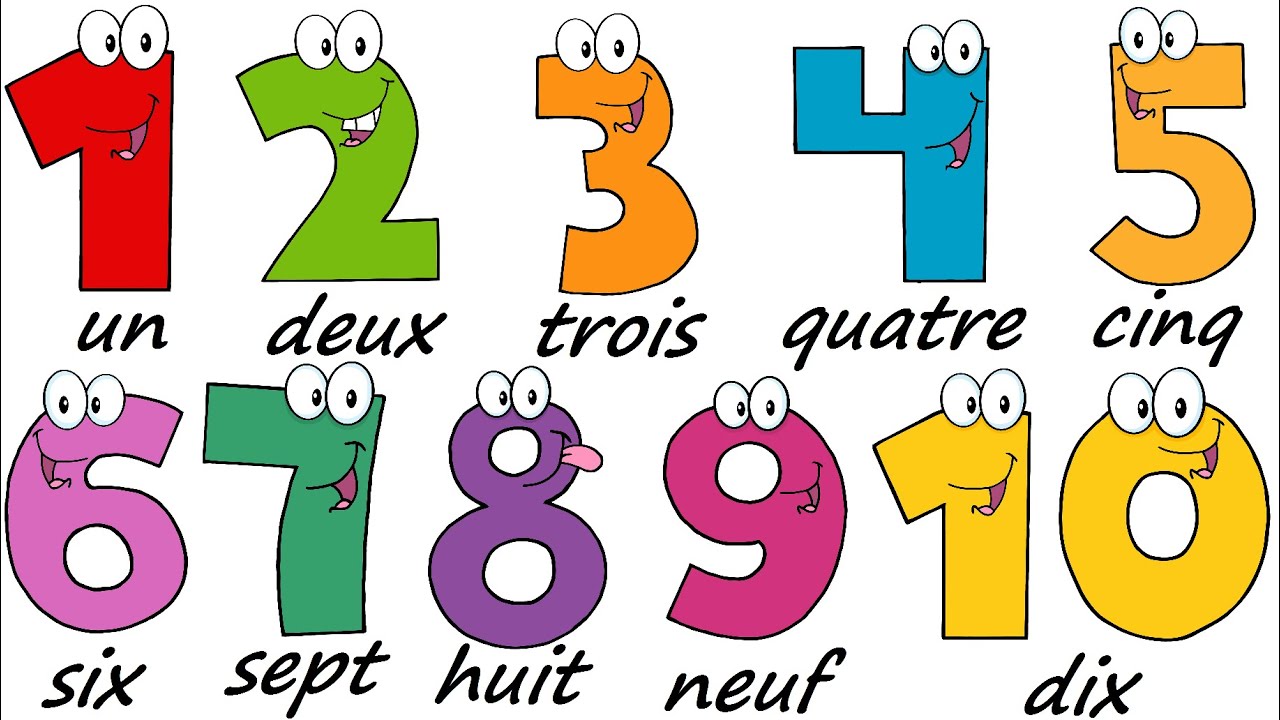
- Show me activities (Given a pack of cards each, had to show the number that was said)
- Guess my number (Had to write down a number between 1 and 10 as a group, each group gets the chance to suggest a number-have to listen carefully as if you repeated a number that had already been said you were frozen out!)
- Strip Bingo / Lotto
- Maths link and karate maths (+ – = using arms as the signs, one person in the class stood up and showed their equation (slowly) while the rest of the class read the equation aloud. 2 (deux) + (plus) 8 (huit) = (égale) 10 (dix)
- Number body shapes
I really enjoyed engaging with these activities. I didn’t feel uncomfortable about joining in, I felt at ease and was having fun. Games are a great way of getting children to take risks and get involved, as soon as things become more formal children begin to retire slightly. My favourite activity was the karate maths and this was really fun but also cross curricula, could even implement this into a maths lesson. I also really liked the actions as applying actions to words makes them a lot easier to remember!

This is a really important issue to raise. Additionally I think if you introduce the written word too soon children will find it harder and be more likely to give up-when they discover that the words are not read phonetically they may become disheartened. However leaving it too late gives no guidance as too how this words should be spelt or written meaning children will hazard their own guess, which are often wrong. 
We then moved on to French phonics-this was hard to grasp as they looked similar to English phonics however sounded different-example of why it is better to learn languages at a younger age, my phonetics have become strongly embedded and are rigid.
We were given phonics fans and did a show me activity.

Next we read a book called ‘Toutes Les Couleurs.’ It was a nice  simple book, meaning it could be used for younger years. The book tells the story of a little rabbit who goes exploring and finds out about all the different colours.
We then had the opportunity to have a look at a whole range of French books. They ranged in terms of difficulty and many had cross curricular links! All could be applied to lessons in some way. The Hungry Caterpillar book is one many children may have read in English-may be a good book to focus on as children would already know the story and this would help them interpret the words. 
Les Animaux
- Round robin (This involed passing an animal around the table and each time it was passed on you had to say the name of the animal, un chat)
- Hot / Cold Game (One person went outside the classroom while another hid a toy animal, when ready the person the came back in and had to hunt for the animal! The rest of the class would say the animals name in French, getting louder as the got closer and quieter if they got further away. This game was great fun and the repetition helps you remember the word!)
- Pass the parcel
- Slap board (Two volunteers went up to the IWB with a fly swatter each. They had to listen out for the name of an animal and the first one to swap the image of the animal one a point!

Next we began to move onto slightly harder areas of learning a language. We began to write short sentences in French from a given model.
- Bonjour/Salut
- Bon Matin/Au revoir
We then had to add describing words to these sentences. The tasks got progressively harder. I liked these activities as it showed me how to progress a certain area of language teaching. 
Adding description examples:
Qu’est-ce que c’est?
- une petite queue
- deux petits pieds
- deux grands pieds
- J’aime les carrottes!
Next we played heads down, thumbs up. There were 5 people who had to go around and pinch one other persons thumb. The only different with this game is that when it came too guessing who pinched their thumbs the guessers had to read out what was  written on the thumb pressers card. (All weather related.) -Again idea of repetition.
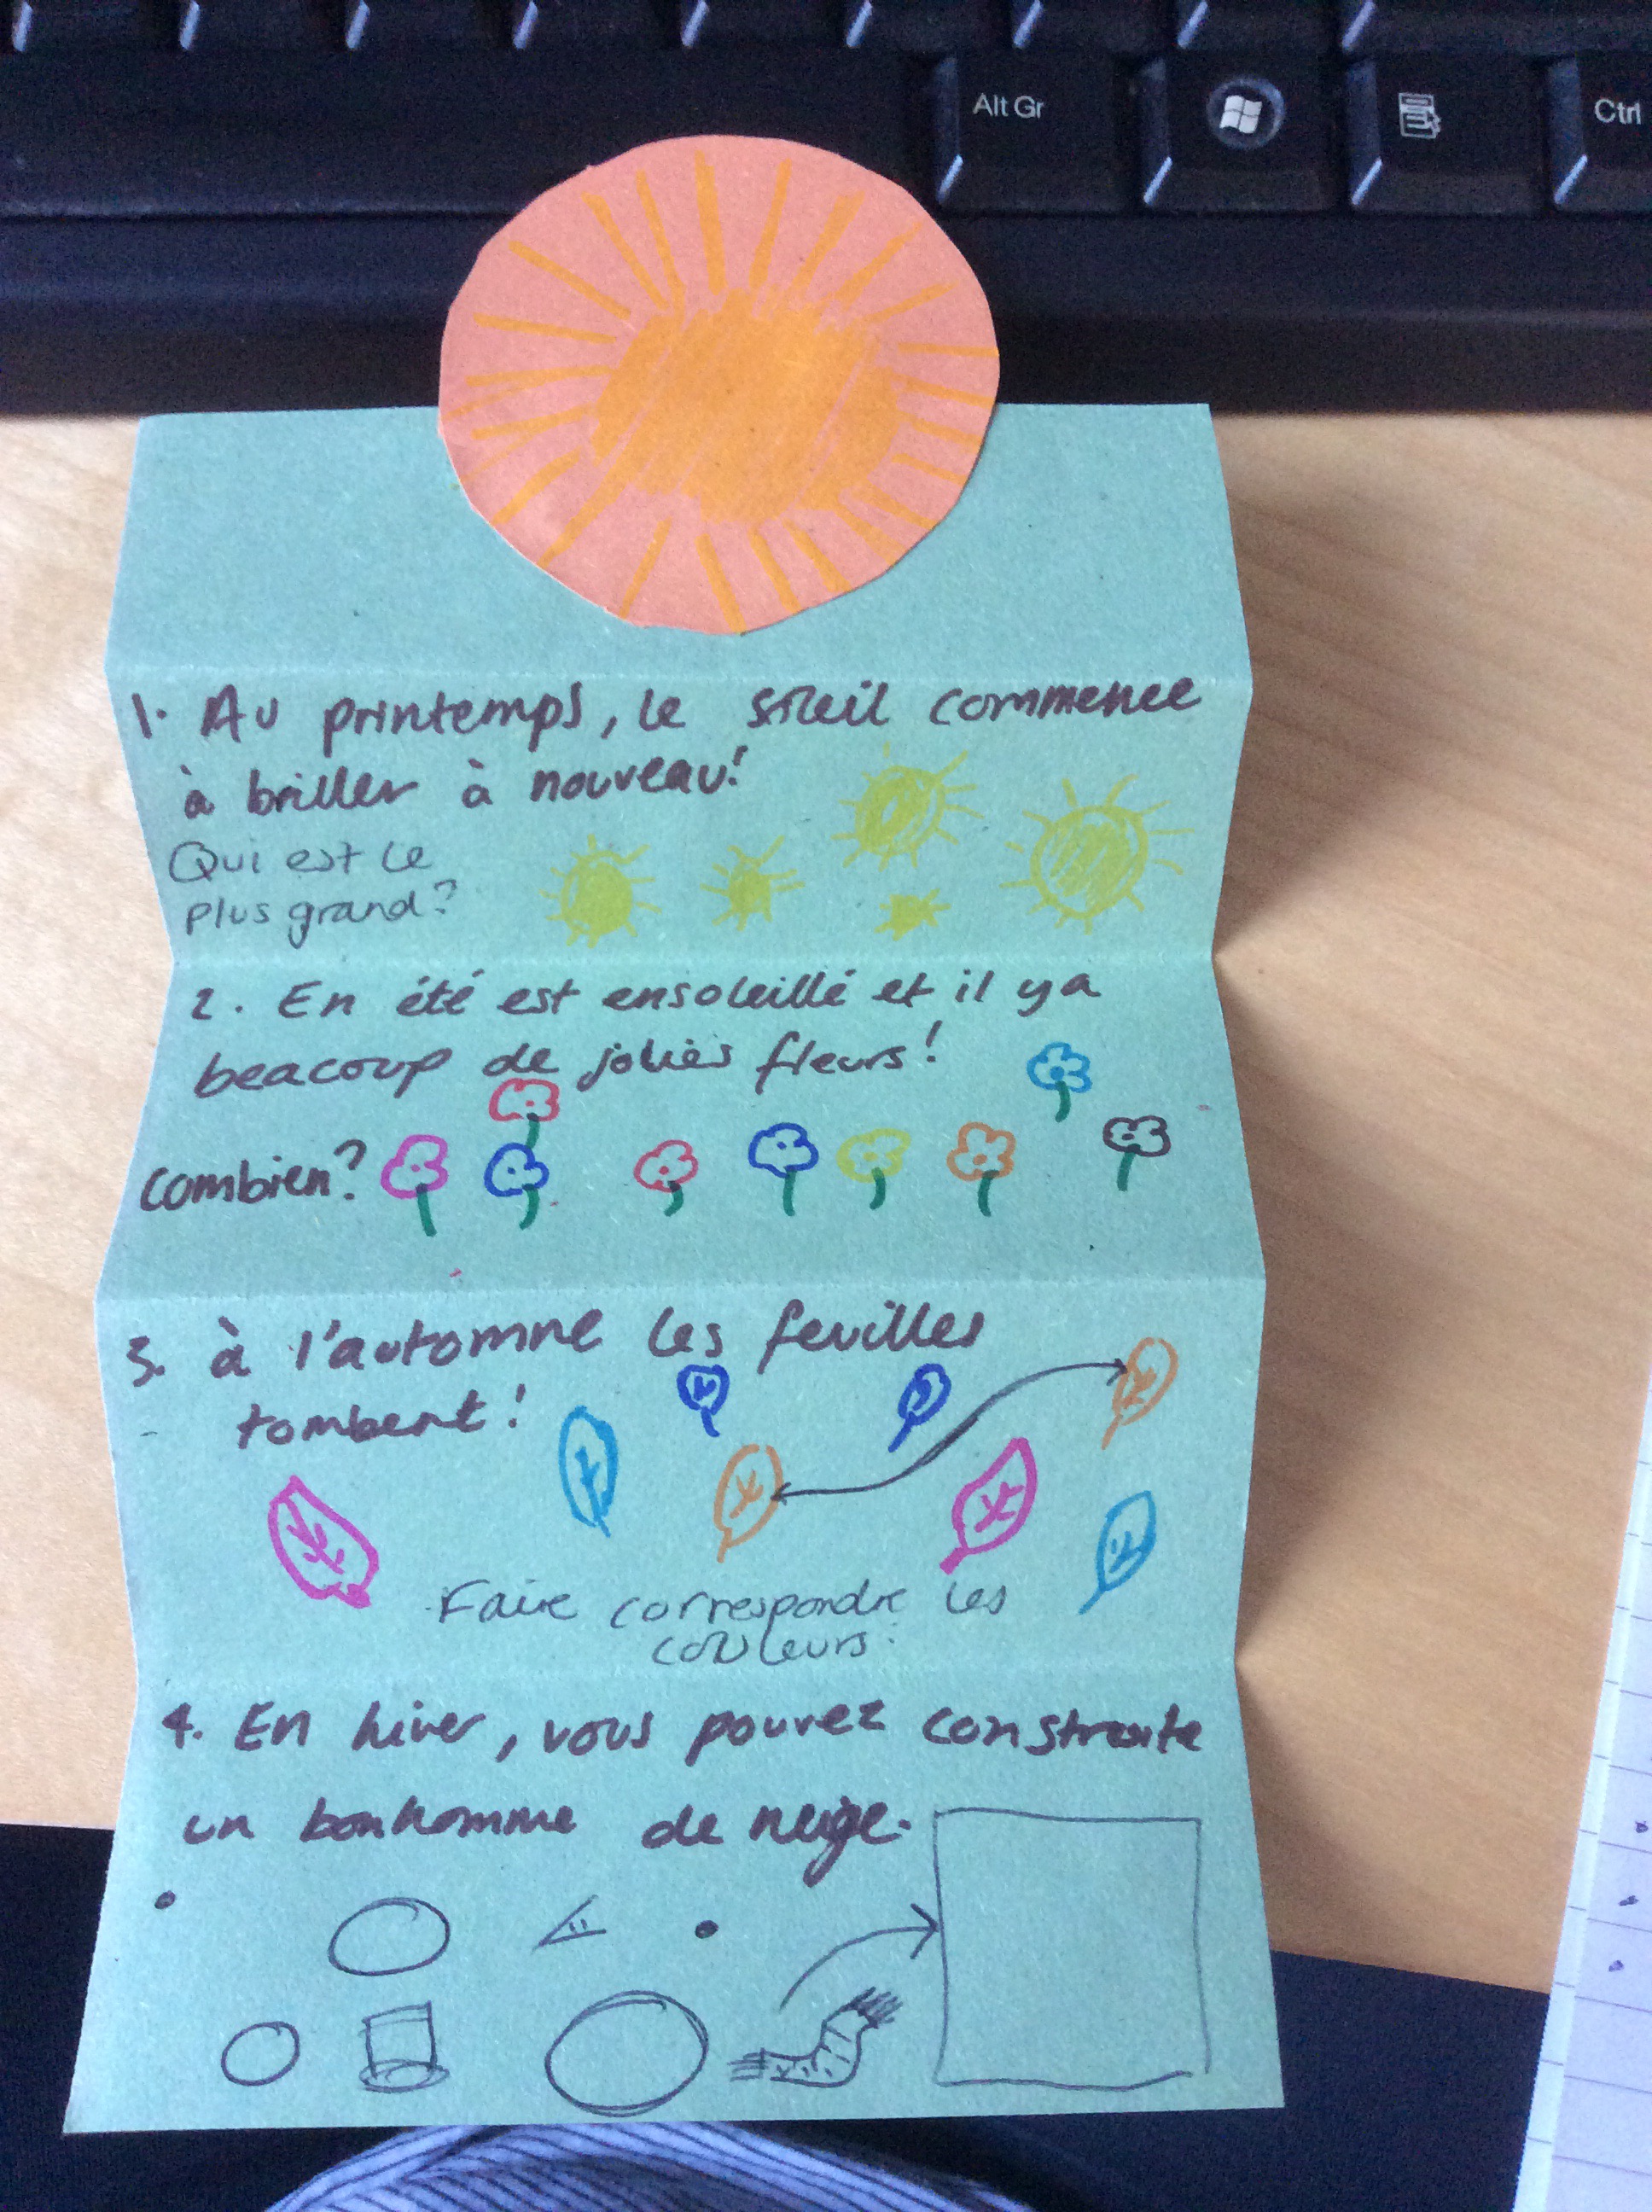
Finally we ended the session by creating our own little books about a chosen topic. I decided to create my about the four different seasons of the year.
Reflection
What I have learnt:
- A whole range of activities and games I can use in language lessons and other subjects
- Feel more confident with teaching a language! Really doesn’t need to be too complex
- How to incorporate books into a language lesson
- Better knowledge of the French basics
This has been my faviourite session so far! It has provided me with lots of ideas and resources that I can take with me into school.
Thursday 11th February
PE
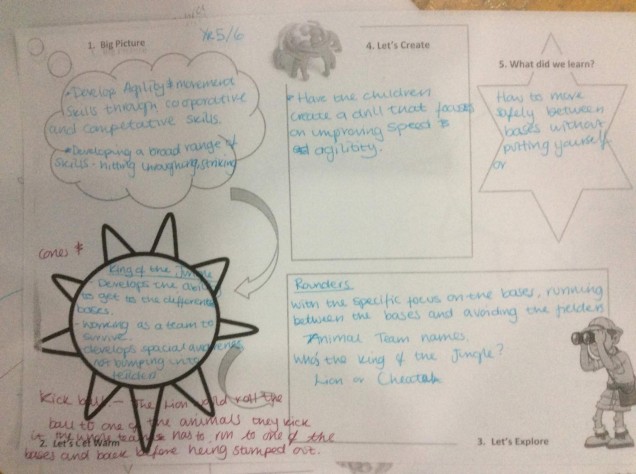
Big Picture
• Identity the specific areas of learning and assessment in the national curriculum
• Consider approaches to promote exploration, investigation and enquiry through different activity areas
• Make meaningful and relevant links to other areas of the curriculum
• Know and understand a range of strategies for effective teaching and learning in physical education
 Next we got up and active!
The purpose and importance of the warm up
- Identify safe working spaces for moving
- Prepare the body for physical movement
- Introduce and explore initial learning ideas
- Observe and assess movement
- Engage and motivate learners
Below are a few videos of example warm ups.
I really like this warm up! I think the story is a great way to engage children especially those who find physical education difficult or dislike it. All the children are laughing and really trying their hardest, fantastic warm up!
This is another good warm up, slightly short. I like that there is music in the background to motivate the children, the teacher is encouraging them and there is a variety of different moves (bear walk, crab walk). However she could have added a few more.
The activities we did in the seminar:
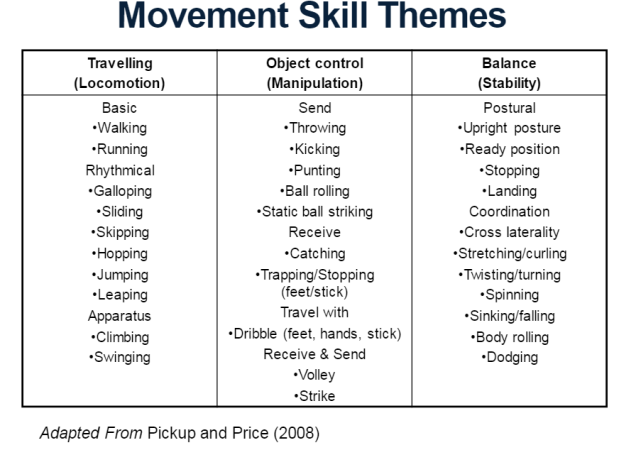
- Starting of by walking around the room and listening out for directions such as skip, 4. (The number represents the speed, 1 is the slow 5 is really fast.) I really liked this activity, it got us all moving and we were adjusting out speeds well. Also works on listening skills, spatial awareness and gross motor skills. You would need a big space for this activity to work well or else the children would just bash into each other. The lecturer was really focusing on the different travel movements as seen in the image below.
2. Next we played a traffic game.
There were lots of coloured dots spread around and we had to run around pretending to be a car. (Start your engines, speed 3, you’ve stalled the car, start engine again, level 2, park your car up on a dot.) This was a really fun game and the children will love making the car noises! Also works on anticipation skills, the children need to anticipate which spot they may be able to park on based on who else is around them.
3. Next we got into pairs and were testing out jumping moves. Seei ng all the different ways we could jump and land.
- Jump from two feet and land on two feet
- Jump from one foot and land on two feet
- Jump from two feet and land on one foot
- Jump from one foot and land on the other foot
4. Next we set up a long jump scenario and had to test out which one was the best, most efficient way to jump in order to get the furthest distance.
We found that jumping from two feet and landing on two feet got us the furthest! This is because you have more balance started from two feet and also more power as you are pushing off from both legs. Landing on two feet again gives you that balance. This activity was about getting children to think about different styles of jumps and also to work on the language (balance, jump, power, height.)
5. The next activity involved choosing a ball from the selection provided. They ranged from small to big, circular to ones with bumps. We started of with basic ball control, throwing the ball up in the air and catching it. Then we moved the ball around our bodies, our legs and head. All these movements are working on children motor skills, hand-eye-coordination and movement skills. Next we had to bounce the balls while moving around a smaller area. This was challenging and I had to keep looking up while bouncing the ball to ensure I didn’t bash into someone else! Really worked on spatial awareness and hand eye coordination. Next there were 3 chasers and they had to knock the balls away from people. Everyone was laughing and really enjoying this activity! 
6. Next we played a treasure collecting style game, this was one of my favourite activities!
There were 4 teams placed in each corner of the sports hall. In the middle were lots of cones, bean bags and circle holds, this was the treasure. The rules were only one item at a time (to start with.) This was a really great game, everyone was really competitive and worked well as a team. Next more rules were added, we were allowed to take items from other peoples bins once all the treasure had gone in the middle! This got a bit chaotic and people began cheating, which I hate, and i’m sure some children would do the same-so this would need to be monitored. When we came back into the middle we counted out who had the post points and the winning team got a point. But there were also points for good use of strategy, vocabulary used, good teamwork etc. I really liked this as it takes it away from the winning, the children begin to realise that its not all about winning the most treasure as there are other ways of earning points. This then leads them to work on their strategy or team work. With this in mind we played one more time and there was a bonus pig added half way through the game, worth 50 points! We came up with a strategy, the cones were worth the most so the sprinters in our team ran to the areas further away from our own bin to get the cones whilst the other members stayed close to the bin collecting up all the items surrounding it. This worked well however the team that were focused on the pig won in the end! However we got a point for good strategy! Shows children that there efforts were not in vain, just because they didn’t win the game doesn’t mean they’re work was rubbish.
This is a similar activity. 
We finished this session by playing a mini game.
There were two teams lined up either side of the hall with two goals at either end of the hall. The lecturer called out 1, 2, 3, 0r 4 and this indicates how many people from the teams line need to run into the middle. Before she calls the number she explains the rules, i.e. ‘you need to pass the ball to each person on your team before you can score’ ‘you can only bum shuffle’ she would also change the object, from a big ball, to a bean bag or tennis ball. This game was incredibly inclusive, everyone was involved, even when you weren’t in the middle you were cheering on your team mates! I really liked the inclusiveness as earlier on in the session we talked about games that were less inclusive. For example in dodge ball if you are hit with the ball you are out. This sends a negative message across to the children and it can really lower their self-esteem. If you weren’t very good at dodge ball and always got hit out how would you feel about yourself and your sporting abilities? We also spoke about having team captains and picking people for teams. At school I was often chosen to be a captain as I loved sport however I hated this as there was always someone last! I always tried to pick the people I thought might have been picked last rather than my friends as its a horrible process to go through! I had been last once in primary school and it really upset me! That is why I really like this game because the lecturer picked the teams and there was nobody ‘sat out’ just watching.
We then had a break for lunch!
In the next session we began looking at Dance.
We started of by looking at 4 key concepts of dance, action (what we do), space (where we perform), dynamics (how we move) and relationships (with whom we move with.)
For each concept there are a set of key words.


Next we looked at some challenge cards. Our task was create a small sequence of dance and if we finish early we had to use of a few of the cards to challenge ourselves and improve the piece.


We decided we wanted to make our jungle themed as it went with the music that was being played. We also chose to have a story that changed rather than a set sequence that we repeated. The story was about a young gazelle being hunted by 2 hungry cheetahs! This was a really fun process and we each input our ideas! It was great watching everyone else performances too. However we had to rate their performance out of 5 afterwards, I’m not sure how I feel about this method. Some children may be quiet harsh and give a low score while others feel bad for giving a low score for a bad performance and may lie and rate it higher. Also once you have the number it doesn’t really explain what you did well and what you could improve upon. Maybe 2 stars and a wish would be a better method for peer assessing dance performances. Our final performance can be seen below.
Our final task was to create a lesson plan and teach one of the activities from this lesson to the rest of the groups.


Here are a few pictures of us all trying another groups activity. We had to go in pairs and one person in each pair was blindfolded. They had to listen carefully to the instructions from their partner who had to help them get through the course. This was a great activity and worked on listening skills, team work, communication and coordination.
Reflection
What I have learnt:
- more about the PE curriculum
- the 4 concepts of dance and the key words for each
- how to create a fun and engaging PE lesson
- how to evaluate my lesson plan, pros and cons
- lots of fun warm up activities and games (treasure hunt, traffic cars, mini games)
- the importance of inclusion in PE lessons
- more about movement skills
Thursday 10th March
Art & Design
L.O:
- Have fun!
- Enjoy having a go-trying some new things, working with different tools and materials-exploring, experimenting, investigate
- Reflect, evaluate and look forward to teaching art
The first task for this session was to share out directed tasks (to create a poster/page on a chosen artist.) I chose Sir Nicholas Grimshaw, a famous architect who designed The Eden Project. I chose this artist as I visited The Eden Project a few years ago and was amazed by the massive biome domes I explored. I wanted to find out more about how the project was designed and explore other pieces of work created by Sir Grimshaw. Looking at everyone else’s pages was really interesting, there was a whole range of artists including architects, painters, sculptors and photographers.


We then discussed how important it is to view a lesson plan through not only a teacher’s eyes (observe, understand and extend) but also through the children’s (explore, discover and enjoy.) I think its really important to plan from a child’s perspective, if the children don’t enjoy the lesson or find it engaging then their won’t be much for the teacher to assess or extend.
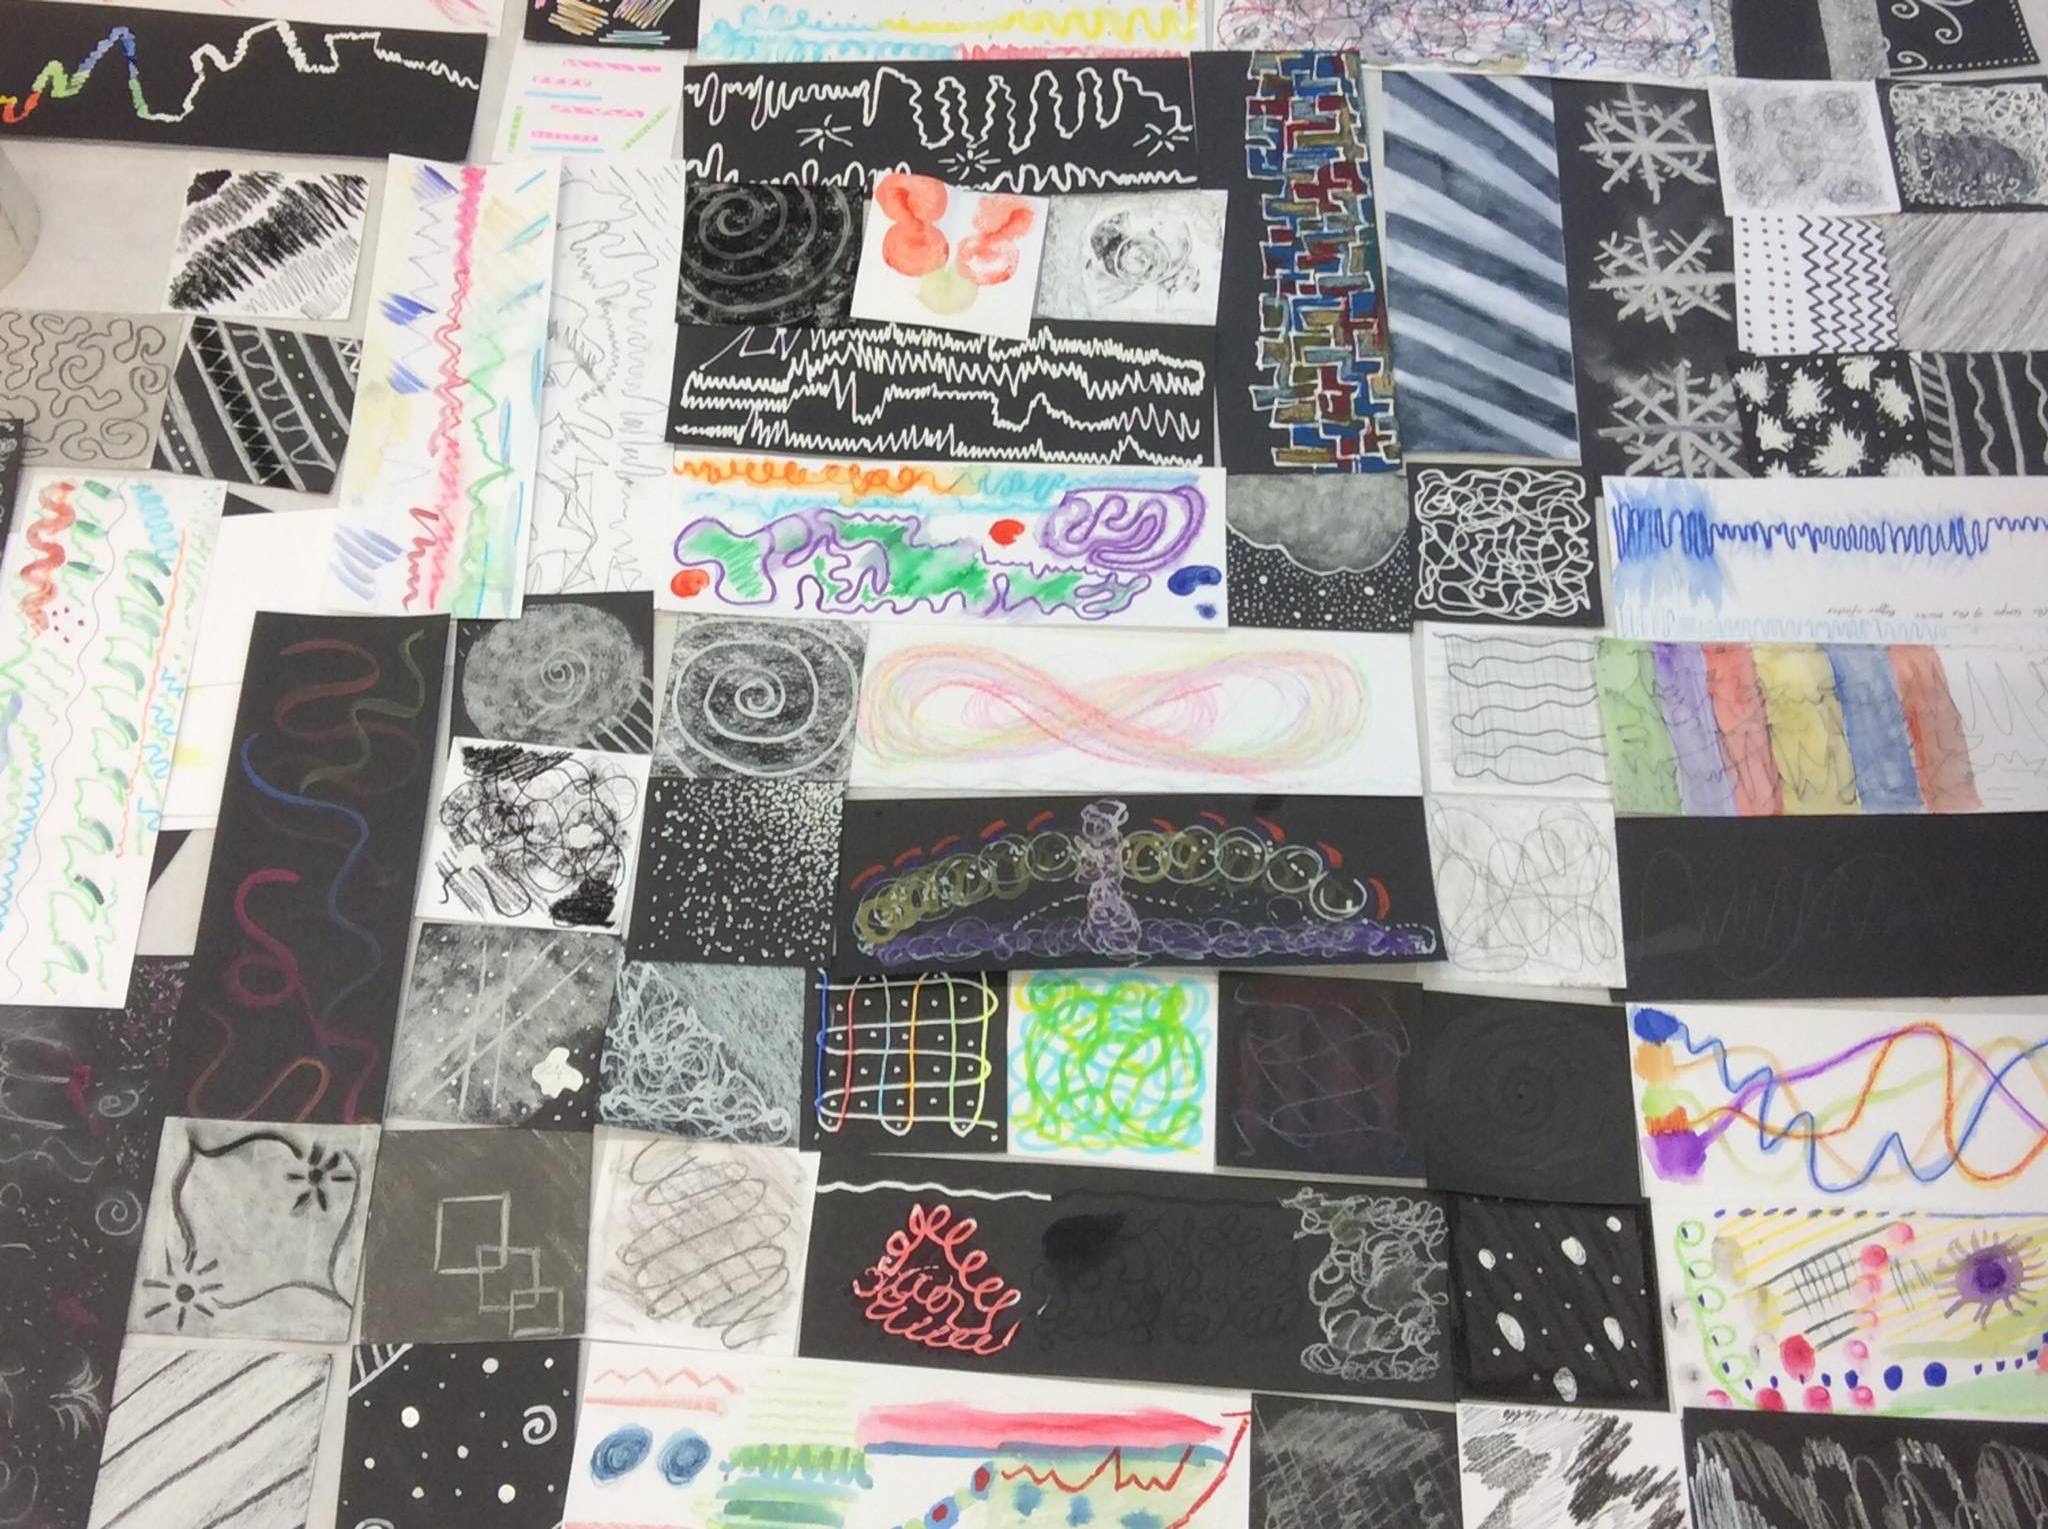
Next we were given some black pieces of card and drew different patterns using an assortment of materials. The white materials (chalk, tip-ex) worked best. However if this is a new experience for children they may try out different colours first before they create the final effect. I liked this activity and feel it would make a good starter for lessons about materials, textures or colours.

Next we drew our own representation of music that was played. This is another good starter activity and has links to music.

We then put all of our different patterns together and discussed them. It was nice too see the range of materials and colours people chose to use.
Next we looked at surface and printmaking process.
- Finger printing
- Mono Printing
- Press Print
Aboriginal finger printing
Firstly I had a look on google images, there were lots of useful pictures which provided me with ideas. I loved all the different patterns and bright colours. I remember doing something similar to this in primary school. We had to finger print a pattern onto a didgeridoo we had made out of cardboard. I really enjoyed this lesson and it was cross curricula- once designed we created a piece of music as a whole class.

I decided to create a snake pattern.
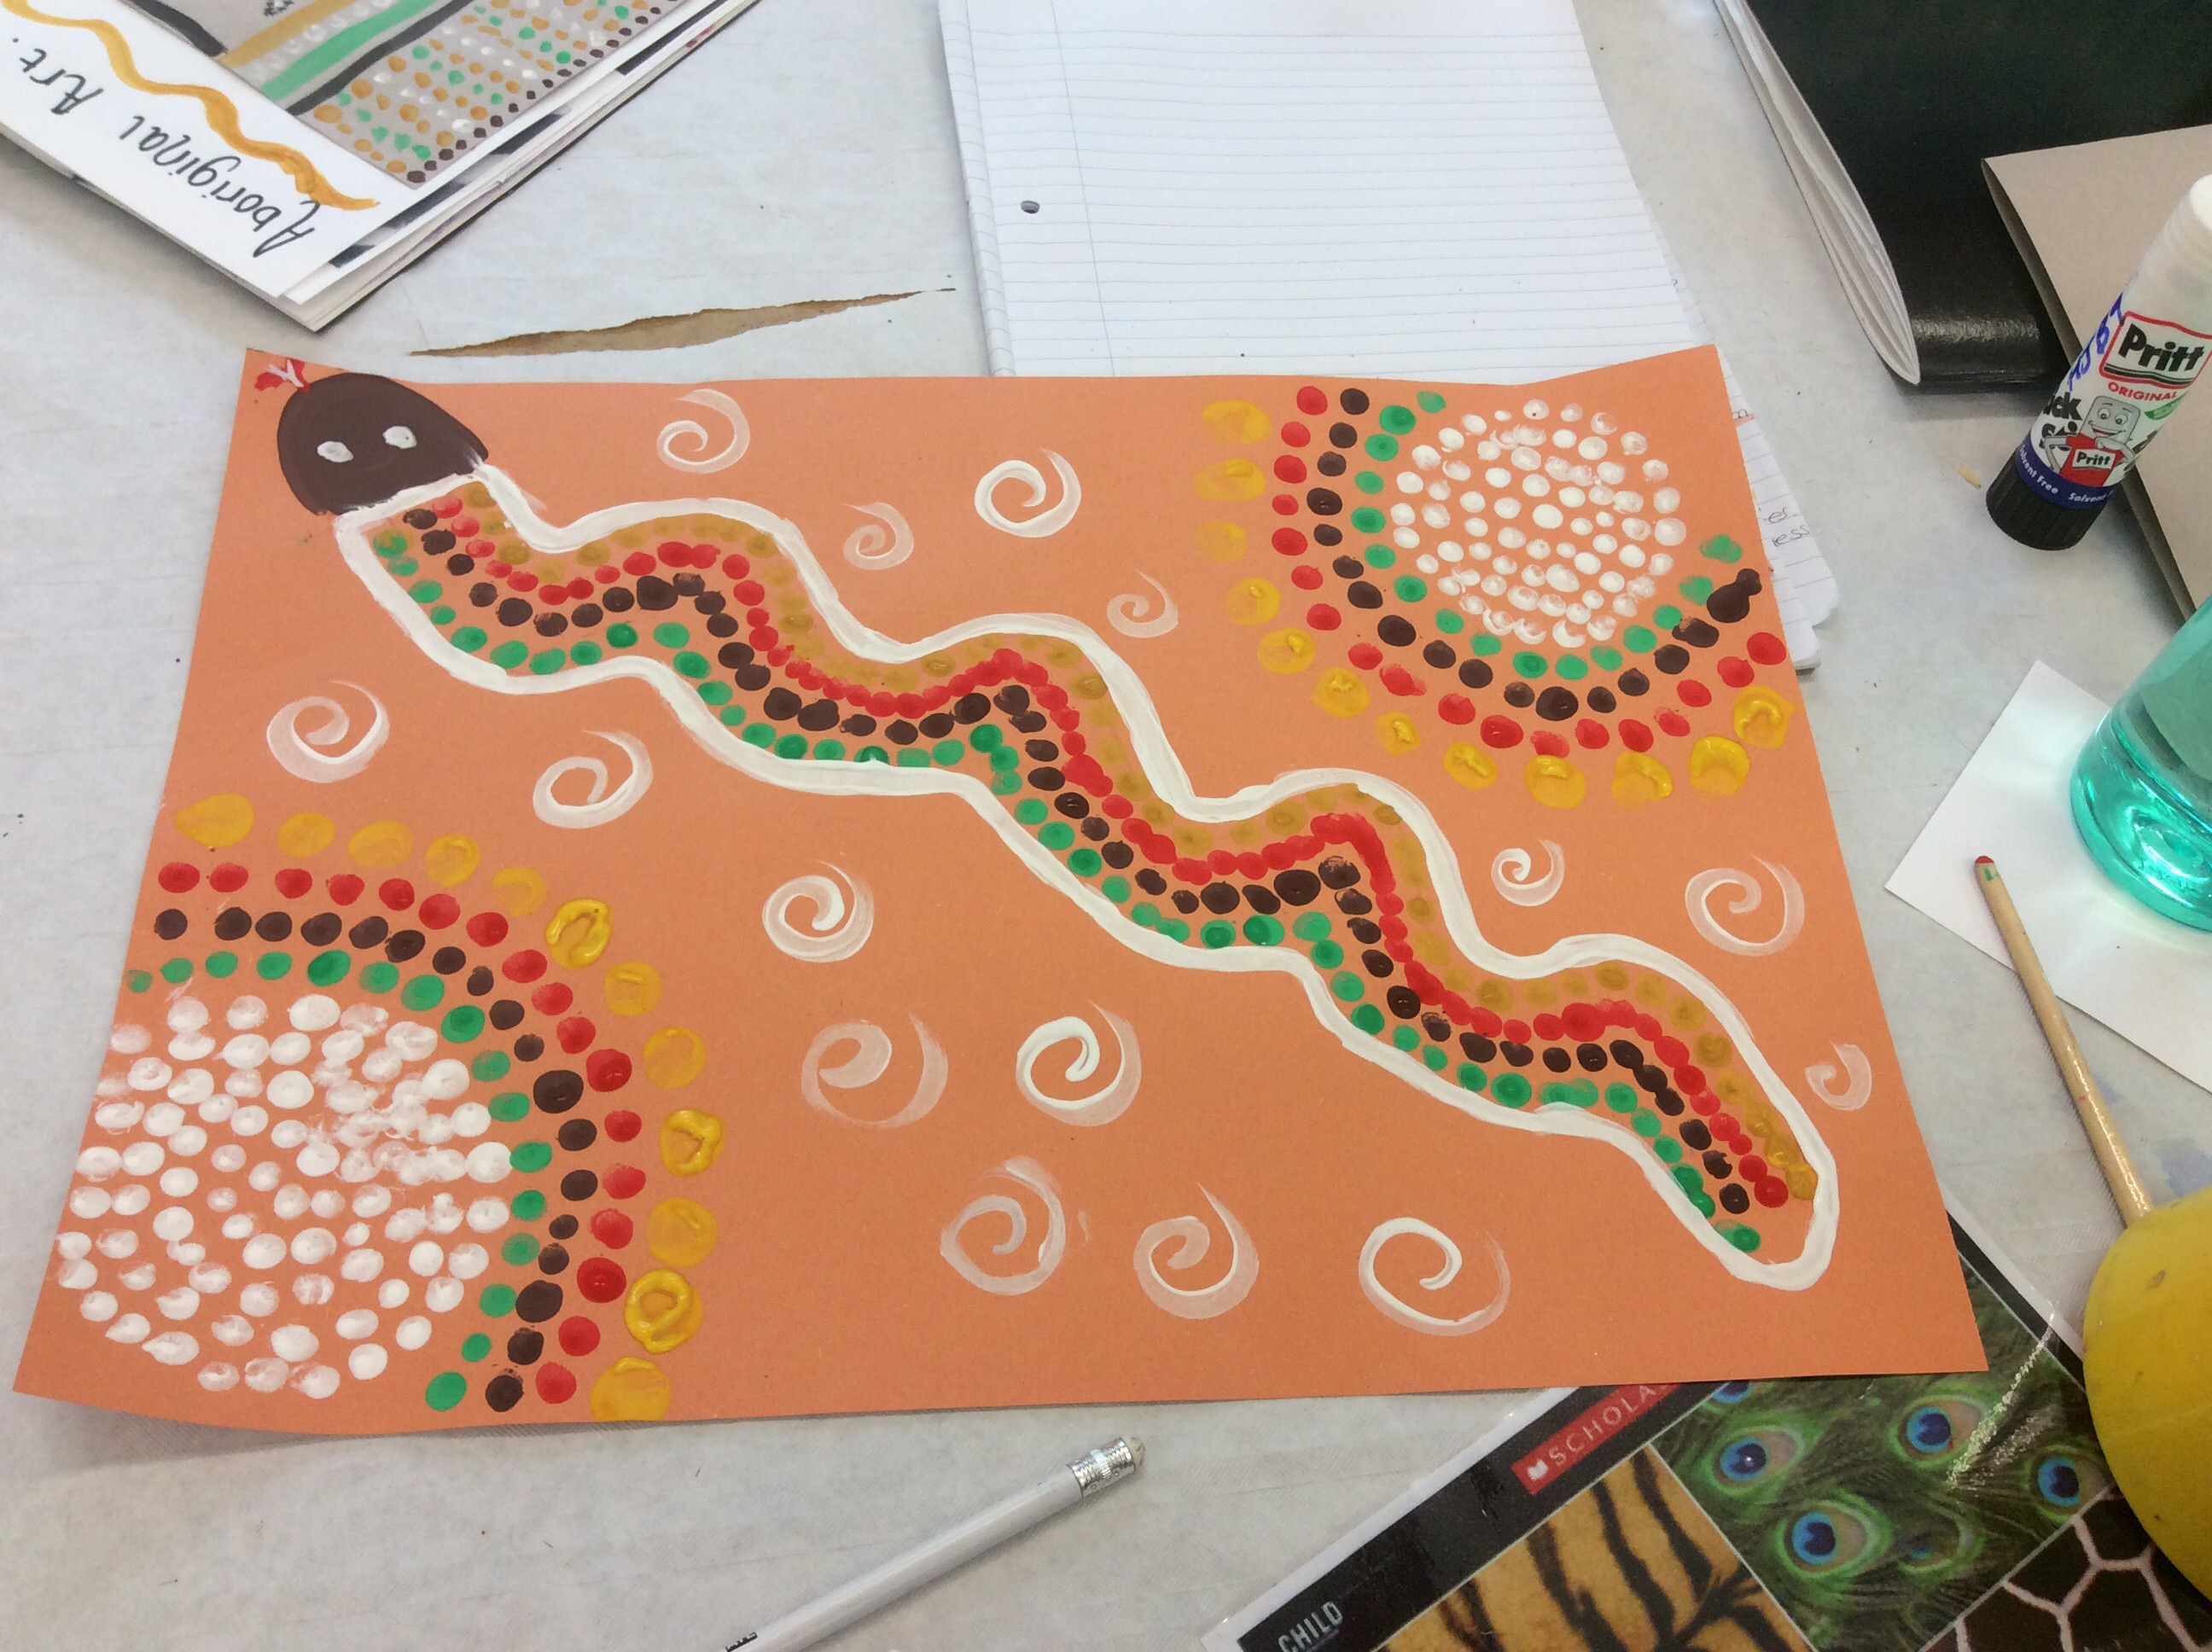
This activity was really fun and I got covered in paint! I noticed that my fingertips were making large dots which creates a good affect. There were other students using the ends of pens and paintbrushes to get smaller dots. I used a paintbrush to paint my snakes body and the swirls surrounding it. It was interesting to see how engaged everyone was, focusing really hard on copying an image from an Ipad, measuring out the paint or while printing. I think in Art children are creating something they want to show to everyone and to be proud of and therefore are incredibly engaged.
Next I attempted press printing. This was my favorite type of printing. Firstly I had small polystyrene square. Using a pencil I drew small patterned indents into my square. I soon realised that for my pattern to be printed effectively my indents needed to be quiet deep. Once I had created my pattern I had to use a special printing paint and a small roller to slightly cover my design. I was surprised at how thick the paint was, I assumed I could just use normal paint. But because this paint is thicker it doesn’t go into the indents of my design. Once I had covered my square in pain I then placed this onto a piece of card. Placing a piece of paper over the top I then rolled over the top with my roller. Repeated this 3 more times to get my final design. I really enjoyed press print, it allows children to get creative, use different materials they may not have used before and experience another form of printing.


The next task of the seminar was to create a carnival animal mask. Again I used my iPad to google images to help me. There was a huge range to choose from.
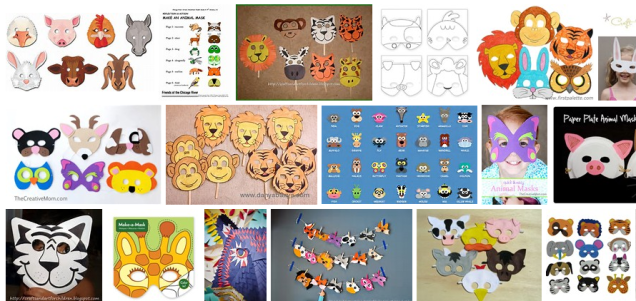
I decided that I wanted to make an owl mask as they are one of my favourite animals. I love that we had the freedom to choose an animal, children can choose their favourite animals and have more fun designing and making them as they will be personal to them. I started of by drawing my design onto the card, followed by painting. I then found some feathers and stuck these on with PVA glue. Finally I challenged myself by adding a beak-making part of my mask 3D.

For the final task we made little monster characters out of clay. I really liked playing with clay at school as it was a strange material that could be molded into anything. I was surprised to find out that big bag of clay was only £4, I thought it would be more expensive. We started of by talking about the clay and how you can manipulate it. First rolling it into a ball with our hands, then stretching it out as far as it could go until it split. We also noticed that after time the clay got quiet dry. I think it is important to explore the properties of clay with children before embarking on a project. To make my monsters I firstly rolled the clay into a ball and then pressing my thumb into the centre I created a hole. The video below reveals the technique of making a similar shape.
I then added teeth, eyes and ears to my monster using water and the crosshatch method. This methods helps two different peices of clay stick together better. The video below demonstrates the crosshatch method.
It was great to see everyone’s little monsters and masks!


Reflection
I have learnt:
- about the different forms of printing (My favourite was print press)
- about the different paints and equipment used in printing
- different artists (Painters, sculptors, photographers etc)
- how to incorporate music into an art lesson
- how to utilise the internet to help with art projects
- to make animal masks using a range of resources
- how to utilise classroom space during an activity
- about the properties of clay
- about crosshatching
Positives/implementing in schools:
- I really enjoyed making the masks.This would be a great project for the children, they could even take part in a mini carnival to show their masks of to the parents.
- The clay pots were really fun to make, however for the pots to last they would need to be strengthened in a kiln cooker, otherwise they will just dry and crumble. Once the children gain the basics of making using clay they could try making pots, figures etc. This could be linked to another subject such as History.
- The press printing was great and will allow children to learn about symmetry and repeated patterns.
Thursday 17th March
Design & Food Technology
The morning session was all about design technology.
Aims:
- Develop an overview of primary design and technology and
an understanding of the curriculum principles - Consider the role of real contexts
- Look at how to make things function effectively by
considering methods of control - Focus on the effectiveness of design decisions and selection
of components - Undertake a design and make task and consider the stages
Firstly we looked at the opportunities that DT brings to children:
- develop their designing and making skills
- develop knowledge and understanding
- develop their capability to create functional products
- Nurture creativity and innovation through designing and making
- Explore the designed and made world and how we live and work within it
- Develop an understanding of design and technological processes and their contribution to our society
I remember doing D&T at school and really enjoying it. We made pencil holders, a buzz game and a jewelry box. My favourite was the buzz game as all my friends and family had a go at playing it and I was really chuffed that it worked! (Relates back to teaching children to create functional products.)
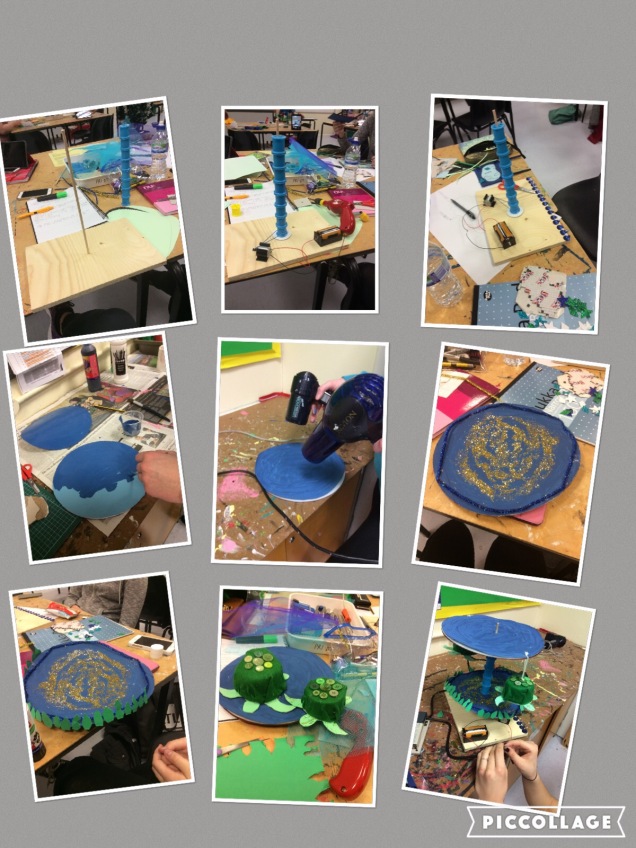
Our first activity involved making a fairground ride. We had to design, create and record the process using our Ipads. We decided that we wanted to make a carousel fairground ride with a sea-life theme.

- mechanically
- electronically
- using a computer
The control of movement by mechanical means using:
- Strings and rods
- Levers, linkages and pivots
- Winches or handles
- Belts and pulleys
- Cams
- Gears
(Pneumatic and hydraulic control)- The control of movement by transferring air or
water usually through tubing. This type of control is often used in conjuncti on with levers
and linkages. Suitable components include:
- Balloons
- Balloon pumps
- Washing-up liquid bottles
- Polythene bags
- Syringes
The control of output using electricity-In primary Design and Technology the main electrical output components used are:
- light bulbs
- buzzers
- motors
The control of the behaviour of external devices using a computer:
- Useful for more sophisticated products

- Earlier experience of electrical circuits is essential
- Programmable toys are useful as an introduction to computer
controlled products - Involve a list of instructions programmed directly into the device
- Examples found in the classroom are generally Roamers or Bee
After a break we moved onto Food Technology.
When I entered the room I was greeted by an array on cooking equipment and ingredients. The tables were covered with a cloth to stop them from getting dirty.
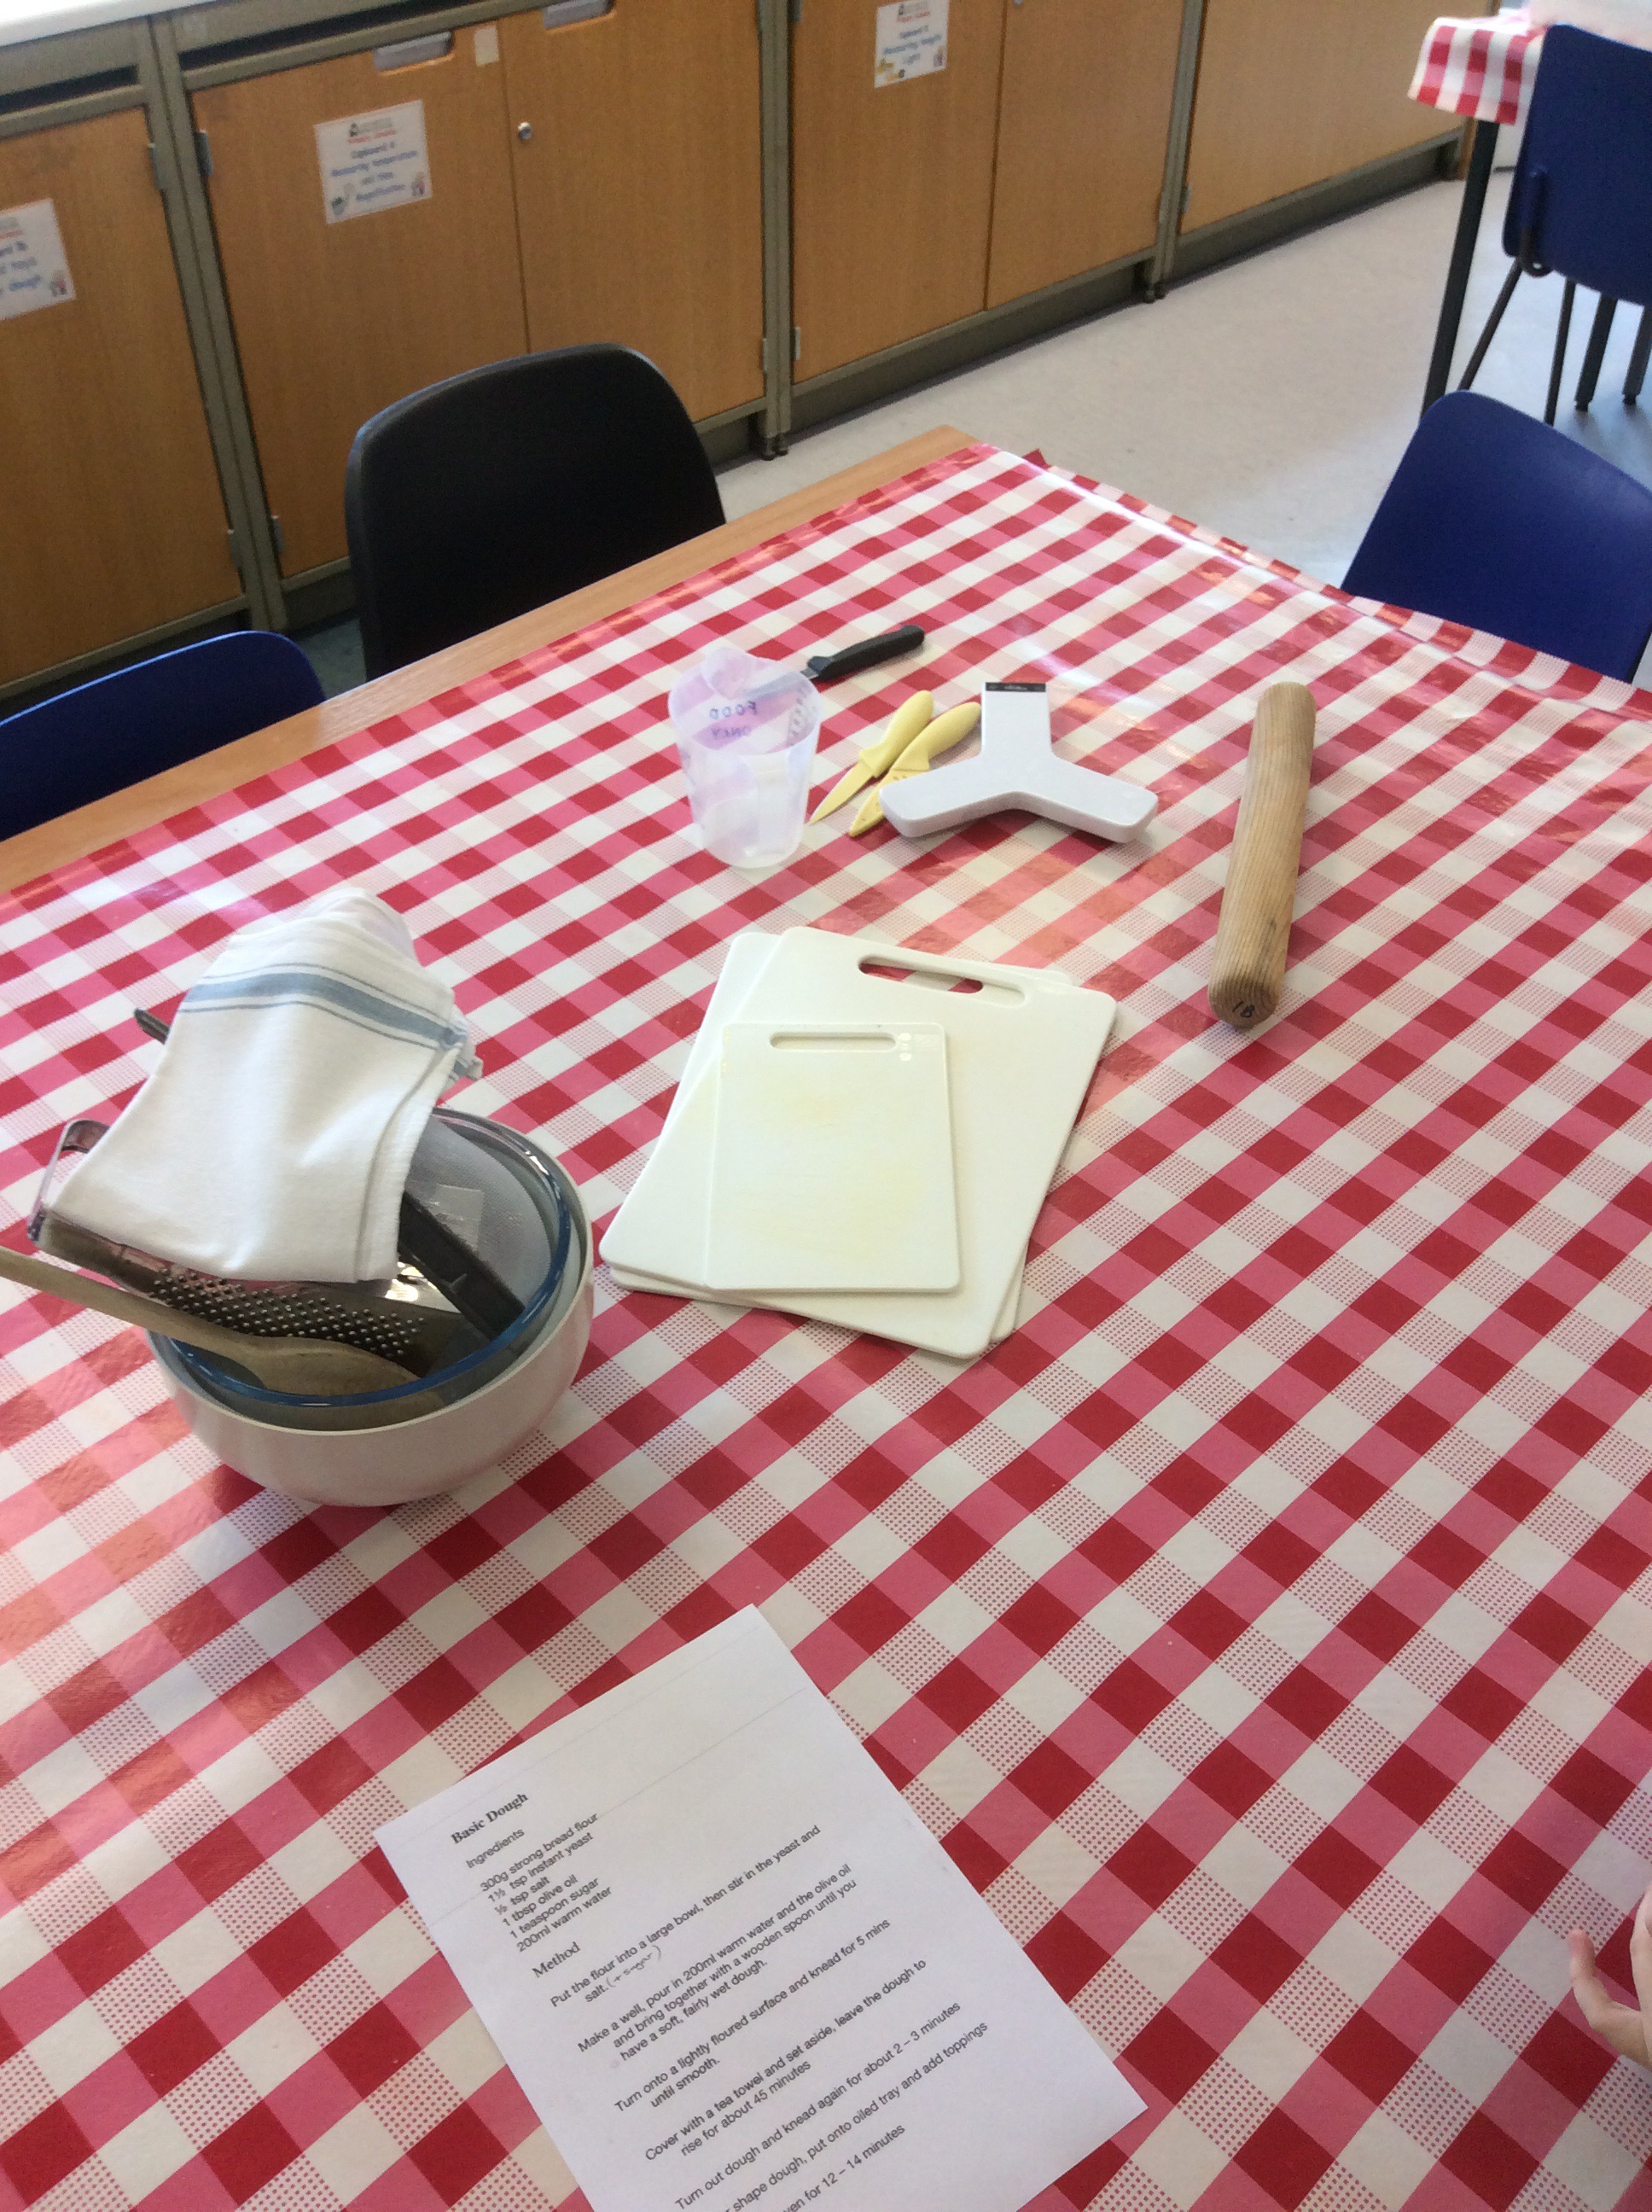

We firstly made some dough following a simple recipe working together. We were in a larger group and at times I found this hard as there were not enough jobs for everyone. For this reason in school I would have the children working in smaller groups of 3-5. This activity is good as it teaches children many basic, important cooking skills, such as:
- to weigh out ingredients using a set of scales
- to measure liquids
- to combine ingredients
- learn about the properties of yeast, self raising etc.
- to knead dough


While we waited for the dough to rise in a bowl covered by a tea towel we discussed the history of Food Technology.
We discussed how ‘The government has announced that it has asked the co-founders of LEON restaurant chain, Henry Dimbleby and John Vincent, to examine school food across the country. They will create an action plan to accelerate improvement in school food and determine the role of food more broadly in school life.’
We then talked about Jamie Oliver who set up ‘School Food Plan’ in 2005.
School Food Plan

The School Food Plan is an agreed plan that has the support of the Secretary of State for Education and of the diverse organisations who are going to support head teachers to improve food in their schools.
• Practical cookery and food education will now be compulsory in the new national curriculum for pupils up to the end of key stage 3 (age 14), beginning in September 2014.
All school children should be offered food that is both tasty and good for them.
In the seven years since Jamie Oliver began his campaign to improve school food in 2005, there has been a measurable improvement in the number of children taking up school meals and the nutritional quality of the food they are eating. This is the result of work done by a large array of people, including the School Food Trust, associated charities such as School Food Matters, and Jamie Oliver’s Foundation – not to mention the individual cooks, teachers, parents, pupils, outside caterers and local authorities who have embraced the cause.
There is, however, still much to do. A recent report for the School Food Trust indicated that quality varies across the country. Some schools have transformed their school dinners; many have also introduced food growing into the curriculum and continue to teach cooking, to give children a lasting education in eating well. But others still struggle to serve good-tasting, nutritious food. In addition there has been recent public debate about the quality of food in academies and what impact the removal of food and nutrition standards may have on it.
I believe that all children should have the opportunity to experience new healthy foods, practice cooking and to learn about healthy lifestyle. For a report to reveal that some schools are still struggling to provide this is awful and needs to be addressed.
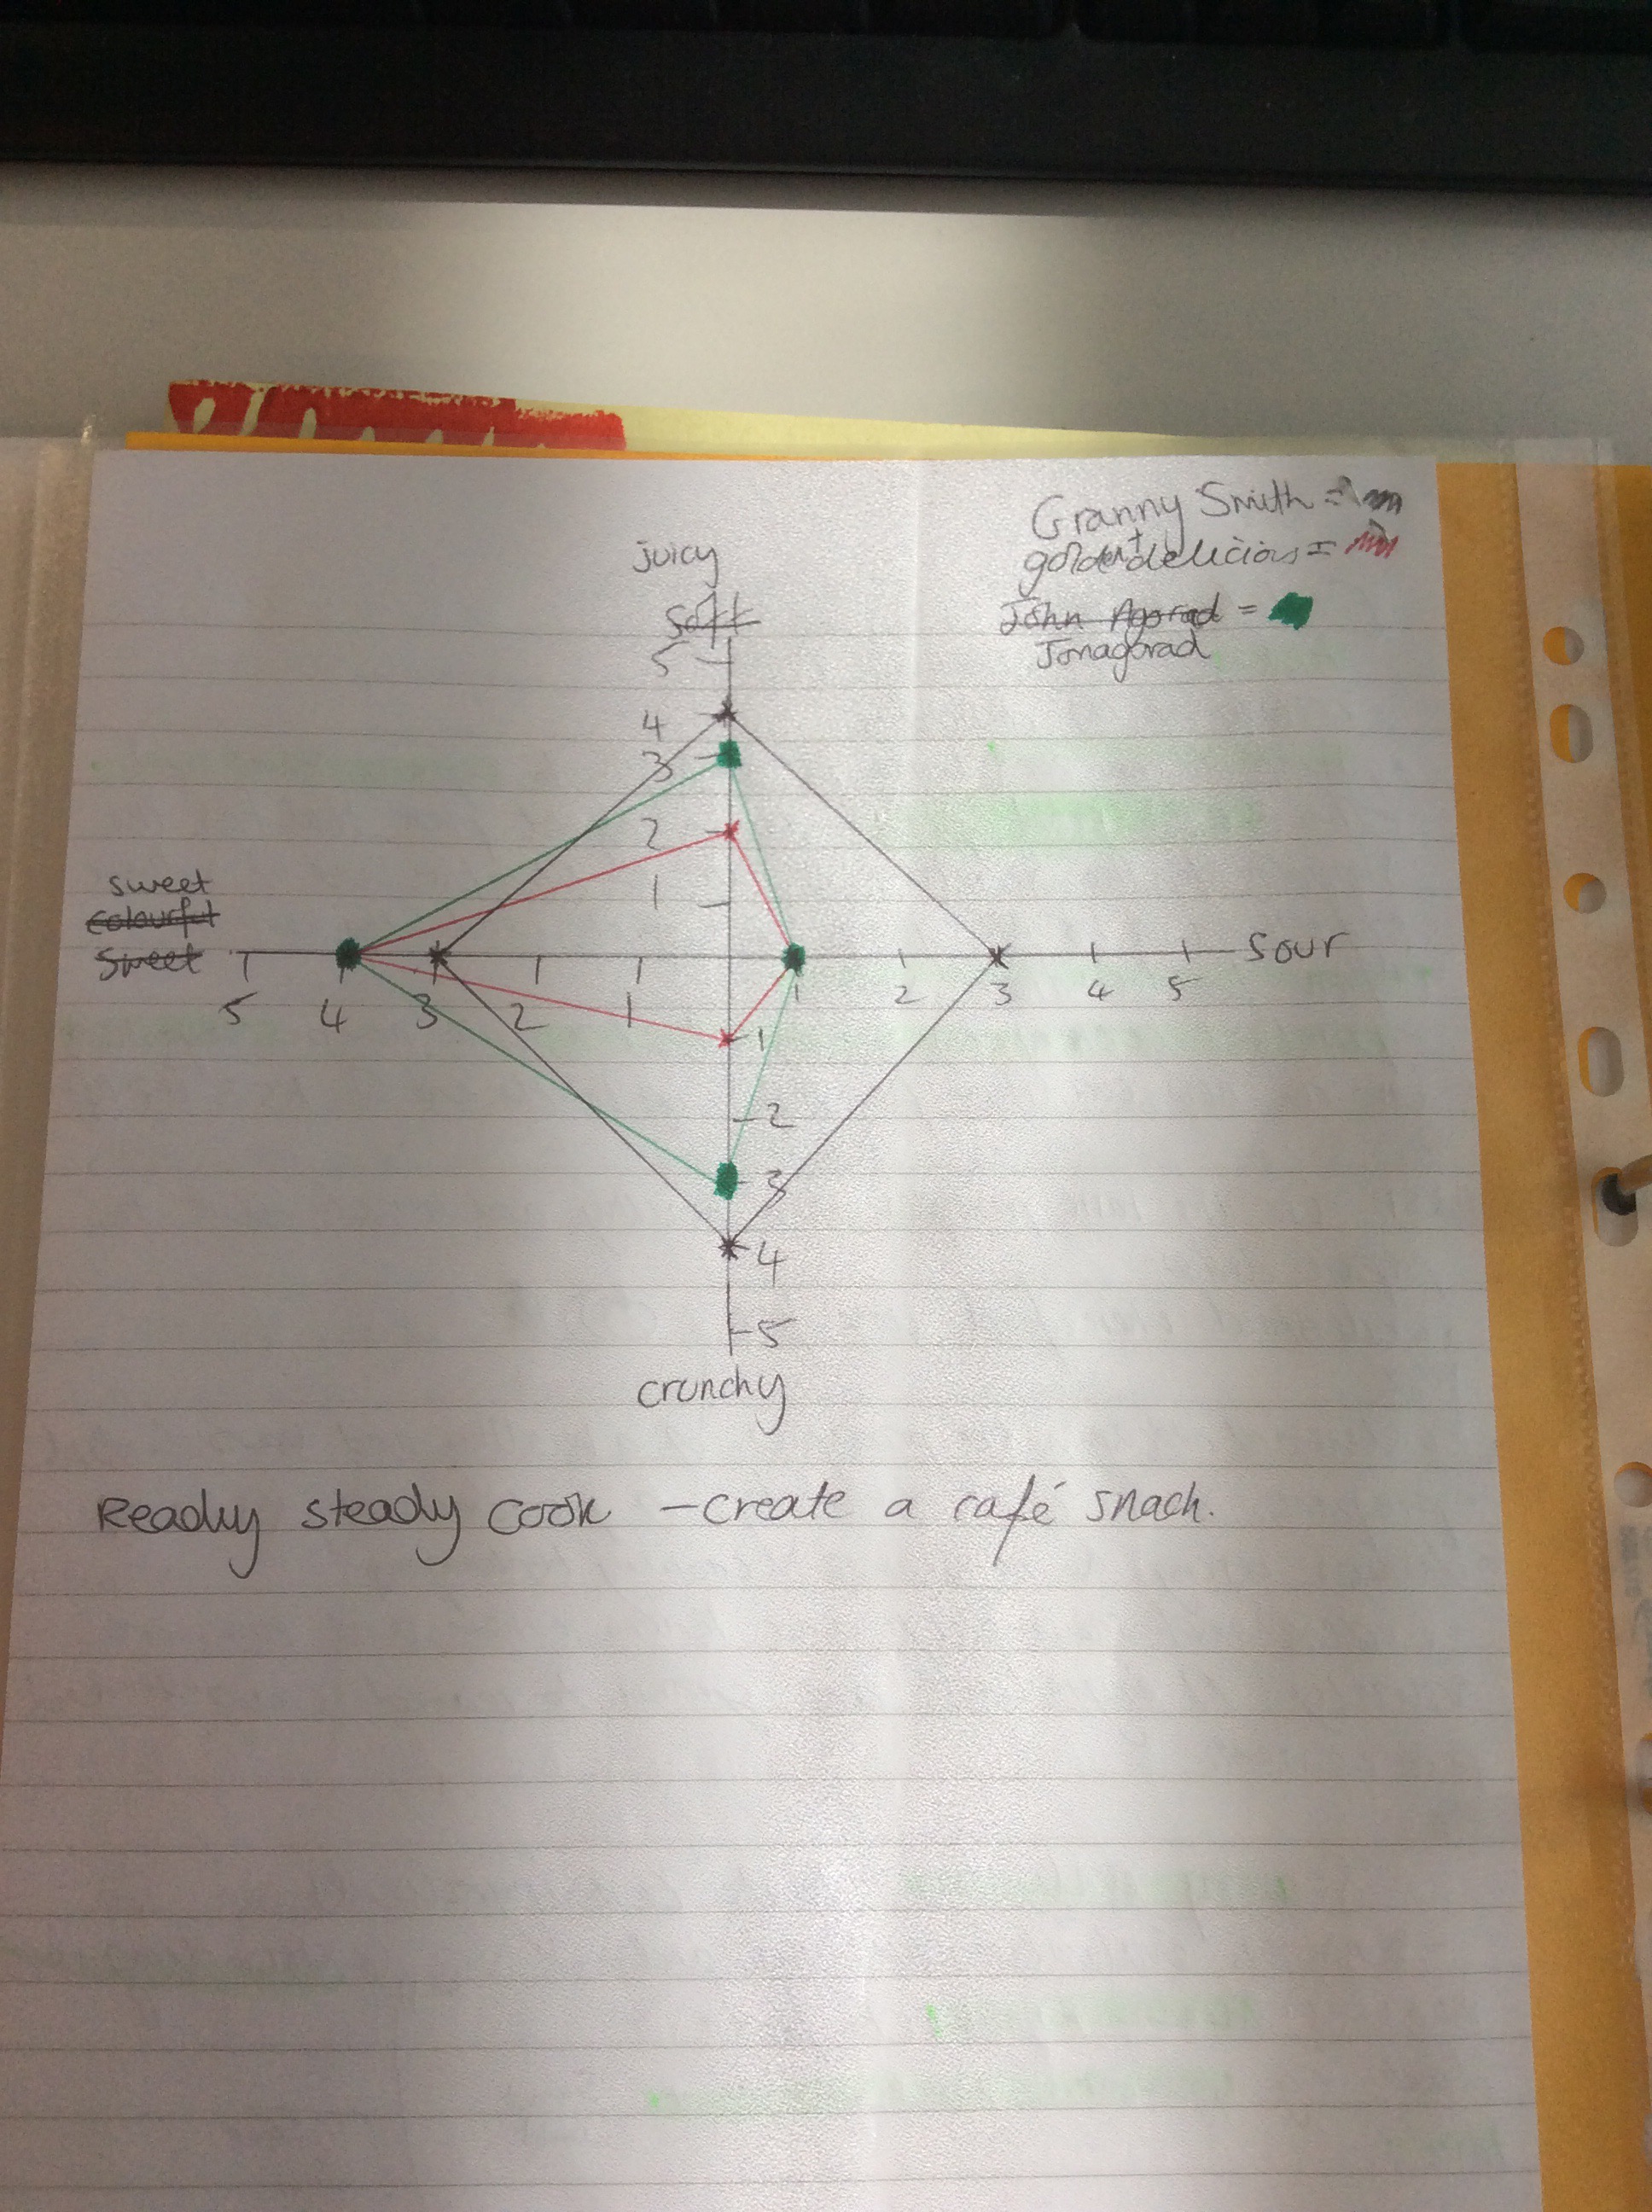
Next we had a go at a taste test using different brands of apples. Sensory evaluation analyses and measures human responses to food and drink, e.g. appearance, touch, texture, and taste. We had to choose 4 different criteria’s and map the results using a star diagram. We chose to look at sour, sweet, juicy and crunchy. 
We tasted 3 different types of apples, Granny Smith, Golden Delicious and Jonathon. It was interesting to try the different apples as I hadn’t really thought there was much difference in the past. However after testing them I’ve realised that they are all quiet different in taste, texture, colour and size. My favourite was the Granny Smith apples however my friends favourite was the Jonathon. Below is an image of our final results in a star diagram. As you can see the Granny Smith was the crunchiest and juiciest and this is why it was my favourite. This is a great activity as it allows children to use their senses, taste and record results, try new foods and compare and contrast different foods.
Final activity! .For this task we had to create a variety of healthy snacks that we would serve in a healthy café. We had a whole range of ingredients to choose from!


Firstly we all made our pizza’s using the risen dough. There was a variety of rise in the dough’s, some had risen really well while others had not. The lecturer explained that the more the dough is kneaded the more it rises. I decided to made a traditional looking pizza with a flat bases, topped with tomato puree, cheese and olives, while others in the group made a cheese twist. It was nice to have the individual choice of what to make.
Ellie made stuffed peppers with couscous and mixed vegetables, while Sav made breadsticks, I prepared to olives and cheese and Elise and Bry prepared some humus, dips and veg sticks. We worked well as a team and shared roles and responsibilities. I really enjoyed this session and feel there are many skills children can learn, such as:
- Creativity
- learning to cook and try new foods
- learning about hygiene and safety
- learning about different cultures
- Team work
- culinary and kitchen skills
We finished by looking around other people’s tables to see what they had made. There were loads of foods we hadn’t thought of such as, cheese of sticks, cheese balls, fruit balls and soup. It was amazing to see the variety of food created; everyone was so pleased with what they had made and we couldn’t wait to tuck in! I think its important to allow enough time for the children to sit down and eat the foods they’ve made together, We often used to take our food home, which is nice, however it is a good opportunity for children to discuss what they like/don’t like, try new foods, try foods they didn’t necessarily make themselves-the fact that they are trying new foods together also provides a safety net so they don’t feel embarrassed or out of their depth because everyone else is doing to same.


We ended the session by talking about:
Health and Safety. 
• Raw fruit and vegetables must be washed before being tasted
• Tool and equipment safety – safe practice with tools must be observed
• Adequate supervision – small groups preferable

• A plastic table cover should be used only for food technology
• Access to hand washing facilities and washing-up facilities must be provided
• Must use appropriate storage facilities for food
Reflection:
I have learn:
- what opportunities DT brings to children
- the 3 different ways to make a product work
- how to make a functional fairground ride and the steps involved
- how to make DT & FT fun!
- more about the health and safety aspects of FT
- how to make healthy snacks
- how to knead dough to make it rise well
- I tried couscous for the first time!
- how to do a taste test and draw star diagrams
- more about the School Food Plan and its aims
Thursday 24th March
Geography
Module Aims
-Consider approaches to promote exploration,investigation and enquiry
-Make meaningful and relevant cross curricular links
-Know and understand a range of strategies for effective teaching and learning across the wider curriculum
On entering the room I was greeted by lots of information about rivers. This was a nice starter activity however was a bit daunting as the whole table was covered, I didn’t know where too start!
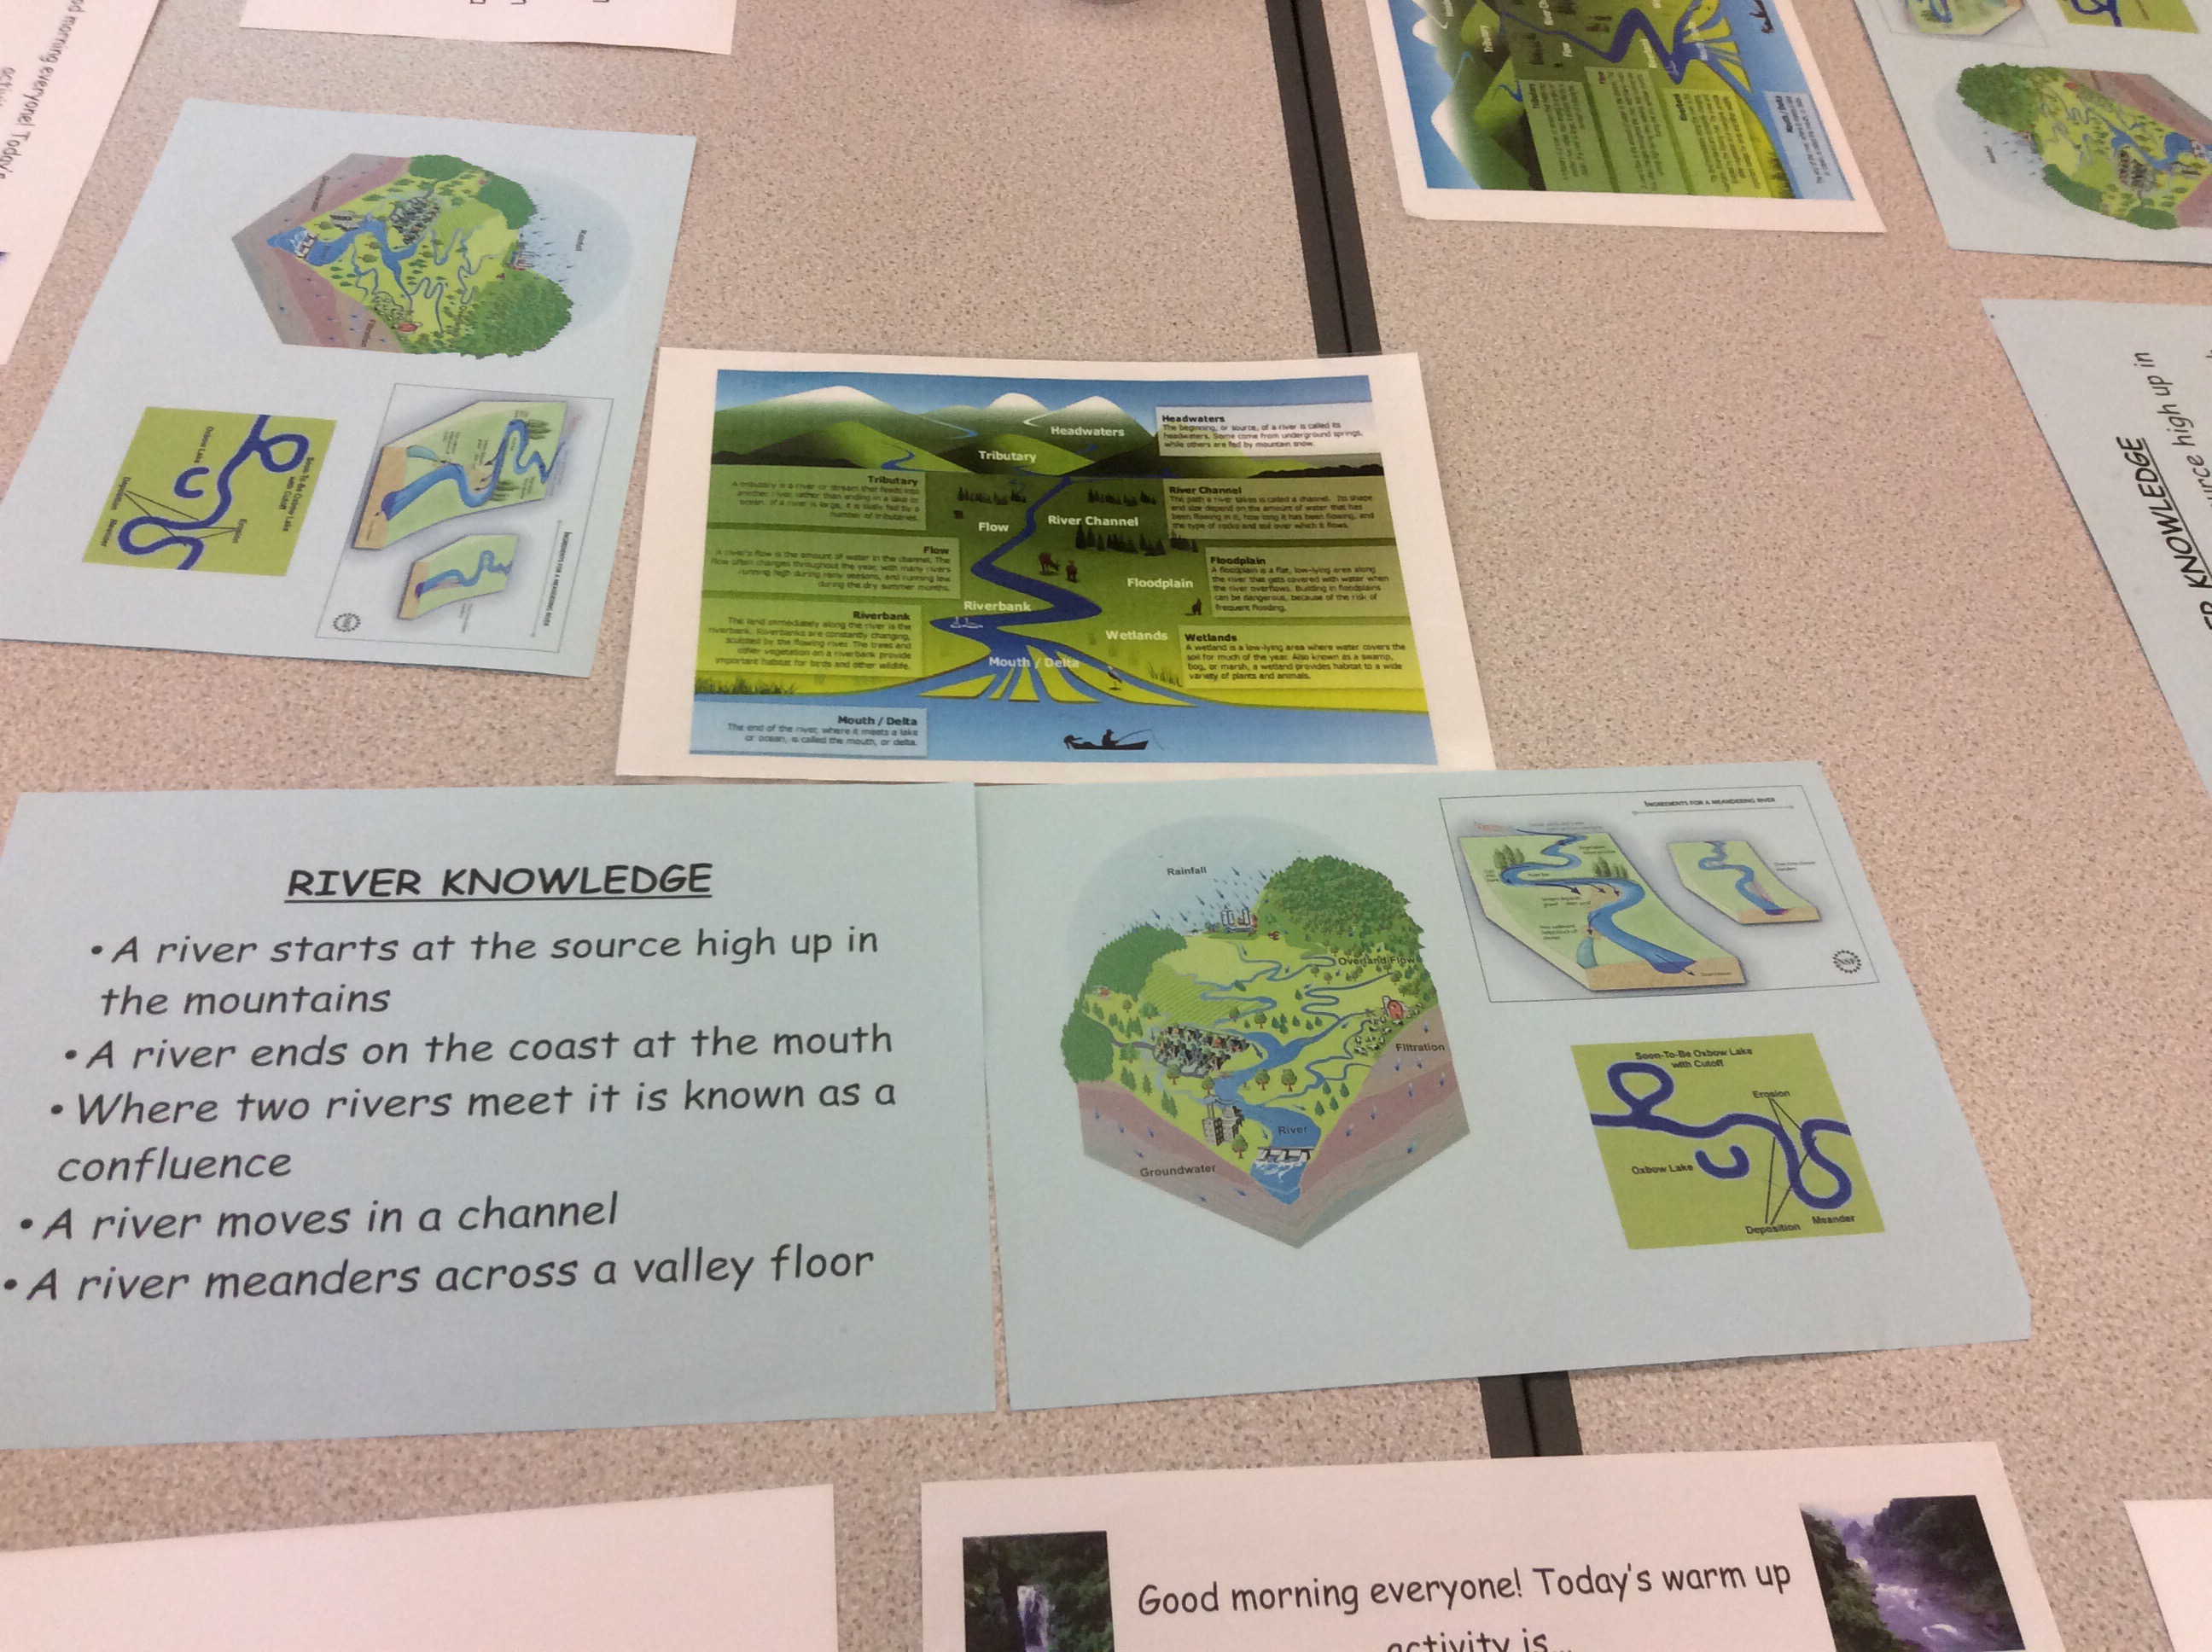
We had to use the resources available to make our own river system and label it using the information to help us.


We began by discussing the Curriculum 2014:
•Sets out only the core knowledge that students should acquire.
•Does not specify approaches to teaching, nor explain how to put the content into a teaching and learning sequence.
•A renewed emphasis on location and place knowledge, human and physical processes and some technical procedures, such as using grid references.
•A renewed commitment to fieldwork and the use of maps, as well as written communication.
•Level Descriptors which made up the Attainment Target have been removed. Schools are free to devise their own curriculum and assessment system.

Next we talked about the diagram below, demonstrating Core Geography.Place, scale and space are the three aspects that make up geography enquiry. To get an overall view of a location it is important to review questions from each section. Place: what is this place called? What kind of features does it have? (Human/physical.) Space:Where is this place? How is it connected to other areas? Scale: How and why are places connected at different scales? Additionally it is important to have a balance of core knowledge (facts, locations, names, vocabulary) and sense of place (senses, emotions, values, opinions) in order to get a good over view of a region on the globe.

scientific investigation and historical research, which defines the way in which geography should be taught in the primary years”
- Observing
- Analysing
- Questioning
- Generating
- Judging
- Selecting
- Planning
- Using prior knowledge
- Reflecting
- Sufficiently open- ended
- Have a high level of ambiguity
- Not present a single theme or moral
- Excite and engage the children’s imaginations
We then watched a video about a useful resource called Topic Dice. I really liked these dice, they are a great way to engage children and get them asking and answering questions. I liked that the teacher had question cards to help the children that were struggling to ask their own. (http://bcove.me/6w6e805j)
Next we watched a video from Urban Earth. Someone was walking with a camera and took a picture every 8 seconds. This showed us the variety across the area he walked. This would be a great stimulus to show children to correct misconceptions of a place.
Finally we looked into using books as stimuli.


Role of the teacher
The teacher’s role becomes that of guide, mentor,facilitator and point of reference rather than some-one who simply imparts geographical knowledge in a didactic manner.
Next we had two hours to explore the city of Winchester and gather photos to link to a theme. We chose the theme of beauty and peacefulness.We decided on a theme and route before we left. We also had a look at the example posters around the room, they looked great and you could tell people had put a lot of thought into them. Other groups left straight away and let what they saw out and about create their theme.


As a group we worked well. We split roles evenly. My job was to be in charge of gathering images on my Ipad, printing them off and cutting them out. Bryony had the job of drawing the Cathedral and printing out the letters. Sami and Elise found the resources we needed (card, string, pegs, glue, scissors) and were in charge of putting it all together.

Finally we presented out posters and explained why we picked the theme. We chose pretty peaceful as a theme because that’s exactly how we would describe Winchester! There are lots of grassy park areas, lazy rivers, loads of places to eat and relax and lots of beautiful sights too see!


Naomi, Emma, Rebecca and Charlotte’s poster

Reflection:
What I have learnt:
- about core geography
- geographical enquiry skills
- how to utilise a stimulus
- how to use useful resources such as topic dice
- the balance between sense of place and core knowledge
- more about the town of Winchester
- how to explore an area using enquiry skills, use ICT to gather evidence and present this in the form of a poster!
- how to create and use mood boards in lessons
